Adjust Image Dialog
Can be opened using the Adjust button within the properties dialog of any image or widget containing images. Many of the tools within this dialog are also available in the formatting ribbons.
The Adjust Image dialog has two modes. Note that the advanced mode will open by default in some cases, such as when editing an image within an Image Change widget.
The advanced mode includes the button, Reset to Defaults, which may be used to repair poor choices in configuration.

Basic mode
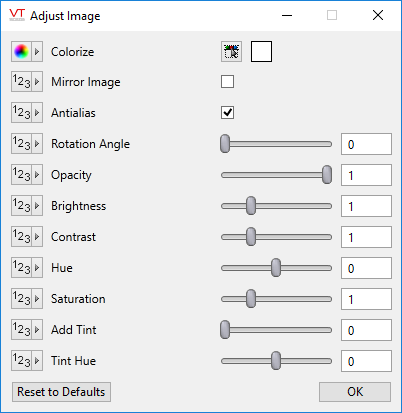
Advanced mode
If linking a widget property to a tag value as part of an expression, you should use the [<TagName>] notation, specifying an absolute path reference to the tag. See: Use Tag Values in Expressions
Colorize
Many images in the library are provided in a gray-scale format. You can use this to add vibrant (or other) color. Indicator lights, found within various widgets, make use of this technique to allow a plain gray disk to appear as a glowing red or green lamp.
With the Colorize sub-menu, you can select one of the pre-set colors to quickly add a tint, or you can open the Select Color dialog to gain access to the full range of options for applying tint, hue, saturation, opacity, and other features.
Mirror Image
Flips the image from left to right. There is no vertical mirror option.
Antialias
Causes images that have jagged edges to appear to have smoother lines by feathering the edge. Note that the feathering may increase the size of the image by extending the boundaries.
Rotation Angle
Rotation is always done around the geometric center of an object's bounding box, and always proceeds clockwise in units of degrees.
Opacity
A sliding scale from fully transparent (zero) to fully opaque (1).
Brightness
A value of 1 (one) uses the image's original brightness. Possible values range from zero (black) to four (white).
Contrast
A value of 1 (one) uses the image's original contrast. Possible values range from zero (a uniform gray with no contrast) to four (very nearly washed-out).
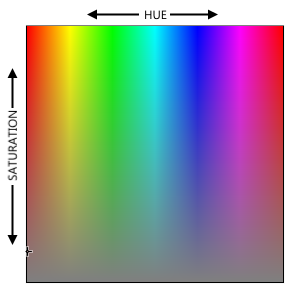
Hue
Useful only if the image is not gray. Values range from -180 to 180 and may be thought of as degrees around the circle of a color wheel, where zero is the starting point. By shifting the hue, you change the base color.
Saturation
Describes the intensity of the hue. In this dialog, saturation can range from zero to two, with one representing the originally defined saturation.
Add Tint
Where hue describes the color of the object, a tint can be thought of as a colored light shining on that object. This slider controls the intensity (saturation) of that light.
Tint Hue
Controls the color (hue) of light shone on the object. Can range from -180 to 180, representing values around the color wheel.
