
If exposing diagnostic applications to the Internet you are advised to take all possible precautions to prevent their use by unauthorized persons.
Do not name any realm, "Rest" or "SQLQuery". Doing so will interfere with remote access to VTScada data.
Configure a Realm
Preparation
Before configuring a realm, the following must be in place:
- Secure the application. See: Best Practices for Security.
- Configure the VTScada Thin Client Server. See: Configure a VTScada Thin Client Server.
If you plan to allow programmers and developers to access diagnostic applications such as the Source Debugger or TraceViewer from an Internet connection then you must secure those applications.
Script applications will run when accessed by an Thin Client. Do not configure them to start automatically.
If exposing diagnostic applications to the Internet you are strongly advised to take all possible precautions to prevent their use by unauthorized persons.
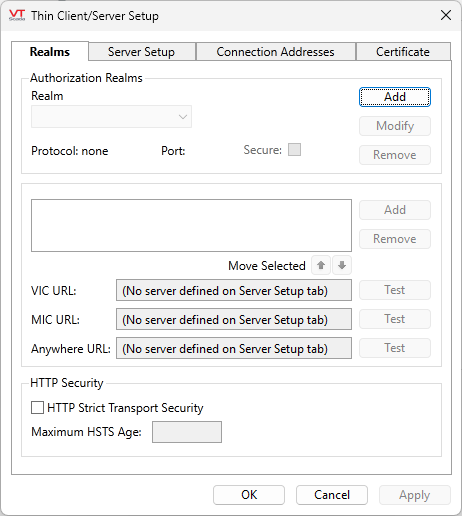
The Realms configuration panel
- Open the VTScada Thin Client / Setup dialog, from the VAM
 VTScada Application Manager.
 - Ensure that the Realms tab is selected.
- Click Add in the Authorization Realms section of the dialog.
![]()
- Enter a meaningful name for the realm in the Realm Name field.
Realm names should not include spaces. Use a hyphen, underscore or mixed case to indicate word boundaries (e.g. "My-Realm", "My_Realm" or "MyRealm" ).
- Enable the HTTP protocol.
- Enter the port number that connections to the server should use.
This may vary from the port number configured in the Connection Addresses tab, depending on your network configuration. - Select the number of clients.
Some sites might allow all possible connections to the same realm while others divide their licensed connections between
- Click OK.
The new realm is created, and you are returned to the VTScada Thin Client / Server Setup dialog where the new realm appears in the Realm drop-down list.
- In the section, Applications Available on [RealmName], click the Add button.
- Select the VTScada application you wish to add to this realm from the Application drop-down list.
- Click the OK button.
The application must be running in order for it to be found. - Test using one of the three connection options.
- Repeat from step 9 if you intend to make multiple applications available on this realm.
It is generally more secure to have only one application per realm, but if your site uses Active Directory credentials, it may be necessary for one realm to include all the applications to which operators might connect.
- Click OK.
Your application is now available to VTScada thin clients.
If all connection addresses are secure, you may choose to enable HTTP Strict Transport Security. This mitigates the danger of an attacker hijacking session cookies. Refer to HTTP Strict Transport Security (HSTS)
Test
Having successfully configured a VTScada Thin Client Server, and a Realm, you can test your work directly from the Realm configuration dialog.
It must be possible to create a local connection to the VTScada Thin Client Server to test using this dialog. If the "Local" box option is not selected in the Server Setup page of this dialog, you should review your Name Resolution service. If there is no network connection, this might be done by editing the HOSTS file in your C:\Windows\System32\Drv\ folder to configure the IP address for your computer name. Also, the application must be running.
Removes the selected realm (and the application attached to it) from the list.
You will be prompted to confirm this action before the realm is removed. (When removing an application from the realm, there is no prompt.)
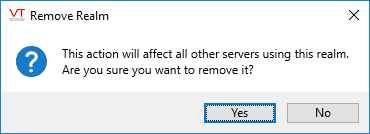
In the case that you have more than one Thin Client Server, the realm will be removed from all. Any users who are connected to the realm will be disconnected immediately.
Troubleshooting:
- Unable to connect.
Check that no other service is using the configured port.
If trying to connect using the server computer, ensure that the Local option is selected (done automatically). If not, it is likely that the domain is not being recognized.
If trying to connect remotely, check that the server is visible on the network. Firewall or proxy server configuration may be required.
Check that the VTScada Thin Client Server configuration was completed correctly.
Check that security is enabled in the application, and that your account has the Thin Client Access privilege.
