
When the Tag Selector dialog initially opens, it displays a list of all the tags in the application that could potentially be plotted. This may easily include thousands of tags.
Use filters in the Tag Selector to find the tags you want more quickly. Instructions follow. While instructions are provided for each type of filter individually, you may use several at once.
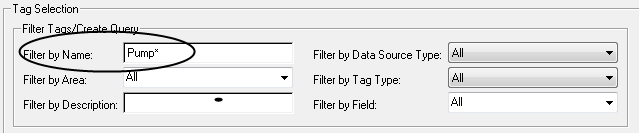
Filter Tags by Name
You may filter the list of tags by the unique name with which they have been configured (i.e. the Name property configured in the tag properties folder for each tag).
- Click the Tag Selector button appearing in the Historical Data Viewer page's tool bar.

The Tag Selector dialog will open.
- Enter one or more characters in the Filter by Name field.
You may use a combination of characters and the asterisk wildcard character (*) to locate a specific tag by its configured name (e.g. "130*" will find all tags whose name begins with "130" or "*B*" will locate all tags whose name contains the letter "B").
- Press the Enter key on your keyboard to input the search characters.
The tags matching the name or characters you entered will be displayed in the Tag Selection list. You may now plot the located tag(s) adding them to the Selected Tags/Queries for Plotting list.
To reset the Filter by Name field (thereby removing name filtering from the list), ensure that no characters are entered in it and then press the Enter key on your keyboard.
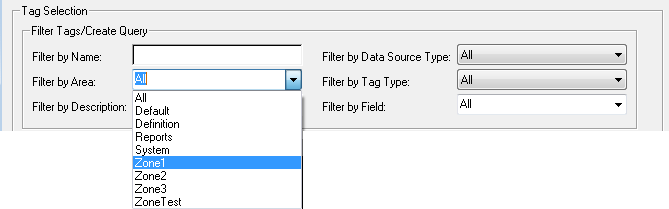
Filter Tags by Area
You may filter the list of available tags by the area with which they have been configured (i.e. the Area property configured in the tag properties folder for each tag).
- Click the Tag Selector button appearing in the Historical Data Viewer page's tool bar.
The Tag Selector dialog will open.
- Select the area by which you wish to filter the available tags in the Filter by Area drop-down list.
The tags matching the area you selected will be displayed in the Tag Selection list. You may now plot the located tags by adding them to the Selected Tags/Queries for Plotting list.
To reset the Filter by Area drop-down list (thereby removing area filtering from the list), select All.
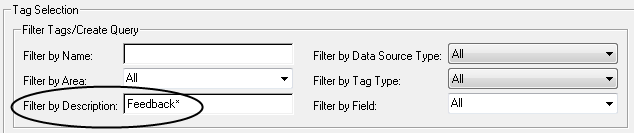
Filter Tags by Description
You may filter the list of available tags by the description with which they have been configured (i.e. the Description property configured in the tag properties folder for each tag).
- Click the Tag Selector button appearing in the Historical Data Viewer page's tool bar.
The Tag Selector dialog will open.
- Enter one or more characters in the Filter by Description field. You may use a combination of characters and the asterisk wildcard character (*) to locate a specific tag by its configured description (e.g. "Well*" will find all tags whose description begins with "Well" or "*3*" will locate all tags whose description contains the number "3").
- Press the Enter key on your keyboard to input the search characters.
The tags matching the name or characters you entered will be displayed in the Tag Selection list. You may now plot the located tags by adding them to the Selected Tags/Queries for Plotting list.
To reset the Filter by Description field (thereby removing description filtering from the list), ensure that no characters are entered in it, and then press the Enter key on your keyboard.
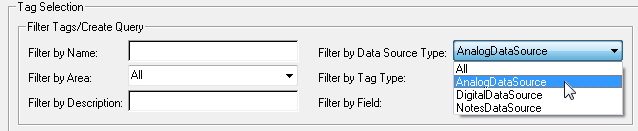
Filter Tags by Their Data Source Type
You may filter the list of available tags by the type of data that they have been configured to read or write (i.e. analog, digital, or notebook).
- Click the Tag Selector button appearing in the Historical Data Viewer page's tool bar.
The Tag Selector dialog will open.
- Expand the Filter by Data Source Type drop-down list in the Filter Tags / Create Query section of the Tag Selector dialog.
- Select one of the following:
- All: Display all data types.
- AnalogDataSource: Display only those tags that read or write analog (continuous or decimal) data (e.g. "123.54" or "62.0") (i.e. analog input and analog output tags).
- DigitalDataSource: Display only those tags that read or write digital (discrete) data (e.g. "1" or "0") (i.e. digital input and digital output tags).
- NotesDataSource: Display only notebook tags.
The tags matching the data source type will be displayed in the Tag Selection list. You may now plot the located tags by adding them to the Selected Tags / Queries for Plotting list.
To reset the Filter by Data Source field (thereby removing description filtering from the list), select the option "All" from the list.
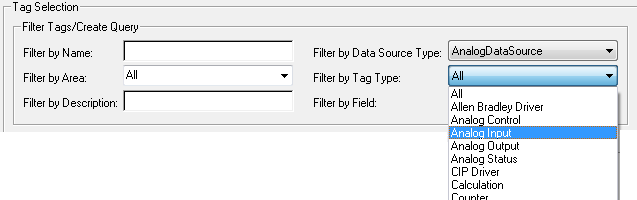
Filter Tags by Tag Type
You may filter the list of available tags by the their type (analog input, digital status, etc.) The list of tag types available will be influenced by the selected Data Source filter. For example, if you are filtering for only analog data source type, only analog tag types will be available for selection in the tag type filter.
- Click the Tag Selector button appearing in the Historical Data Viewer page's tool bar.
The Tag Selector dialog will open.
- Expand the Filter by Tag Type drop-down list in the Filter Tags / Create Query section of the Tag Selector dialog.
- Select one of the tag types.
The tags matching the data source type will be displayed in the Tag Selection list. You may now plot the located tags by adding them to the Selected Tags/Queries for Plotting list.
To reset the Filter by Tag Type drop-down list (thereby removing tag type filtering from the list), select All.
