Page Property Reference
Use the Page Properties ribbon to control the appearance and behavior of each page you control.
Page management commands such as New, Open, Import and Delete are found in the File menu, rather than the ribbon.


Opens the Select Color dialog, from which you can choose any color you like for the page background. Some developers will set a color theme for certain groups of pages as a visual guide for operators. While helpful in some cases, it does little good for operators who are color blind.
In general, if setting a background color always choose a neutral shade, to avoid eye strain and not distract operators. If designing to high performance HMI standards, choose a shade half-way between the "ON" color of equipment (usually white) and the "OFF" color (usually dark gray). Doing so allows both colors to stand out against the background.
Use any image on your computer for the background of the page, using the Image Selector.
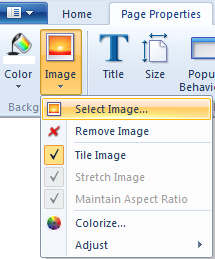
If a background image has been applied, you can use this same tool to remove the image.
You can force an image to fill the page using either of two options: Tile will cause the image to repeat in an array until the entire page has been filled. Stretch will re-size the image until it fills the screen. If stretching the image, you can choose whether the aspect ratio is to be maintained.
The Colorize option opens the Select Color dialogue, with which you can add a color to the image.
The Adjust menu contains six further controls to adjust opacity, brightness, etc.
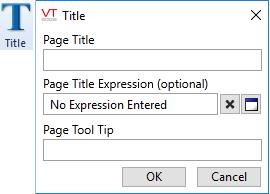
Pages are (apparently) identified by their title. But two or more pages can have the same title. What will always be unique is the file name, which is easily discovered by hovering the pointer over the page's tab at the bottom of the Idea Studio.
If you are familiar with VTScada's expression language, you can create one to display a title that can vary. This is seldom used outside of parameterized pages, but there can be very useful.
The same dialog is also used when renaming a page or widget
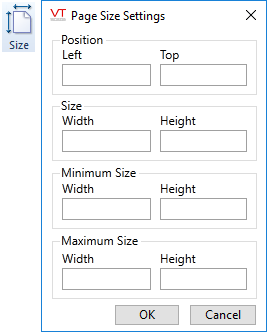
Size settings apply (mostly) to pop-up pages. Using horizontal and vertical coordinates measured in pixels, you can set initial, minimum and maximum sizes and the location on the screen, measured from the top left corner of the screen to the top left corner of the page.
Size settings have no effect on standard pages other than to set defaults for the first time it opens, but they can be extremely useful in limiting the apparent page area in the Idea Studio. By setting a page size that matches resolution of your monitor (or the smallest monitor that the application will be displayed upon) the Design Studio's working space will help you stay within this area.
The default minimum Width by Height for an Anywhere Client is 1366 x 768. If you set smaller values, some standard VTScada dialogs may become unusable.
 Choose between No Restrictions, Always Pop-up and Never Pop-up.
A page marked as "No Restrictions" will open as a standard page when the operator left-clicks to open it but will open as a pop-up window if the operator right-clicks to open it. Note that you can use application properties to limit how many pop-up pages may be open at a time and what will happen when an operator attempts to open one past that limit.
Opening a pop-up from a pop-up will always result in a new window, never with the new replacing the old in the same window. The subsequent pages must be marked as "No Restrictions" in order to stay within the same window.
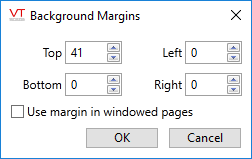
Unless otherwise configured, a standard page includes a title bar, for which it reserves the top 41 pixels. A pop-up page does not. Switching from one mode to the other as you build a page will seem to add or remove 41 blank pixels as the title bar is removed or added at the top of the screen.
See: Limit Pop-up Pages.
 Optionally select or remove the thumbnail image, used for reference when working with the page. The thumbnail image is not shown as part of the page, like a background.
Choose to include or exclude standard items in the title bar and task bar of the page. Note that standard pages and windowed pages (pop-ups) are configured separately. By default, windowed pages do not have a title bar or task bar but you can add these and then go on to select which elements are shown.
Advanced developers can use the PageWinOpt variable for additional control such as disabling the Windows minimize / maximize buttons.
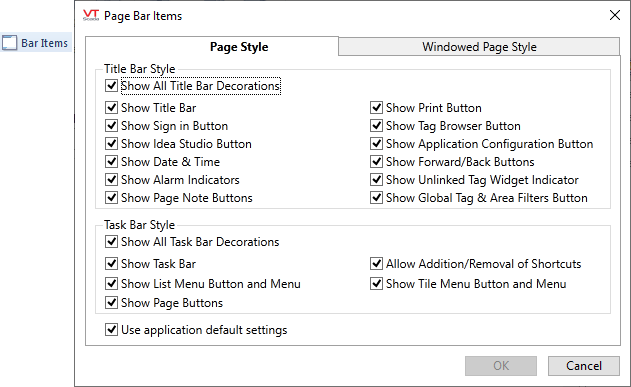

Title bar with all decorations shown:
| Title Bar Item | Description |
|---|---|
| Windows title bar |
The Optional Windows Title Bar may or may not be configured for your application. If it is present, it displays the title of your application in the left corner, and includes a minimize, maximize, and close button in the right corner. |
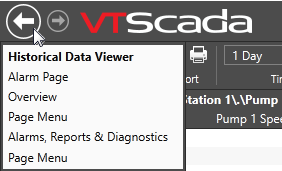
| Previous page |
Click to open the previously viewed page. If no page has been viewed previously (this is the first time you are running the application) then the tiled page menu will open. |
| Next page |
Click to step forward after using the previous page button. If you navigated several steps back in the list of previously visited pages, then click and hold this button for a list of "next" pages. |
| VTScada Logo | Click to open the tiled page-menu. Developers can set the page to be opened using the property, TitleLogoTarget. |
| Page title |
The name of the page you are viewing. |
| Unlinked widgets | Click to toggle individual flagging of unlinked widgets. While individual flagging is off, this button will blink orange as a warning. |
| Page editor |
Click to open the editor window, where all development work is done. |
| Application properties | Opens the application properties window, with its many configuration and administrative tools. |
| Add page notes |
Click to add a reminder note, resembling a 'yellow sticky' to the page. |
| Hide page notes |
Click to temporarily hide (not delete) all page notes. This button is visible only when there are page notes to hide. |
| Tag & Area filter | Visible only to operators with the Tag & Area Filtering security privilege. Used to filter tag lists, especially when viewing the alarm page. |
|
Click to print the current VTScada page using the default Windows printer. |
|
| Alarms |
The Alarm button informs you of an alarm condition by flashing red. You can open the Alarm page by clicking this button. |
| Time/Date | The Time/Date displays the current system time and date. |
| Sign in button |
Click to sign in to your account. After you have signed on, this button displays your account name, but is still a button. Click again to sign out or to access the security dialogs if your account is authorized to do so. |
The task bar is used for navigating through the pages of your application.

Task bar with all decorations shown:
| Navigation Bar Tool | Description |
|---|---|
| Menu list | When clicked, this opens a customizable menu of the pages for your VTScada application. Selecting an item from the menu opens that page. |
| Menu tiles | Opens a tiled menu of pages. Tiles in the upper portion are recently visited pages. Tiles in the lower portion match the contents of the menu list, with sub-menus shown in folders. A navigation bar between the two portions keeps track of which folder is open in the lower part of the display. |
| Pinned pages |
These buttons provide single-click access to different pages in the application. They are under your control and different users can have a different list of buttons. Use the pin icon in the displayed page to pin it to the bar and the "x" icon remove a pinned page. You can change the order of the buttons by dragging left and right. |
| Current page | The name of the current page is highlighted. |
It is possible to remove the standard Windows title bar controls from a page, but this can only be done by editing the page's source code and then using the Import File Changes button in the VTScada Application Manager.
This is an advanced procedure, intended only for those who are comfortable using the VTScada scripting language.
If removing the Windows close control button from a page's title bar, you must ensure that you add a Page Close Button widget to the page. Failing to do so will mean that operators have no method for closing the page.
To remove the Windows control tools:
- Open the source code for the page using any text editor. (Use the button in the Home ribbon of the Idea Studio to do this.)
- Close the Idea Studio before proceeding. This will avoid the possibility of a conflict between the page being edited in the Idea Studio and the same page being edited within a text editor.
- In the editor, add a PageWinOpt variable declaration immediately below the Title = ... line, as shown:
[
  Title = "Pump Control";
    { Bit number 98765432109876543210 }
  PageWinOpt = 0b00001010000100011010;
- Save the file.
- Open the VTScada Application Manager and click the Import File Changes button for your application.
Further information about the bit-wise window options can be found in the parameters for theWindow
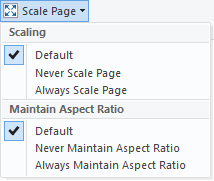
Default applies the application property ScaleDisplayContent to the contents of this screen. Otherwise, you can choose to always or never scale the page.
If scaling the page, you can also choose whether to force the aspect ratio to be maintained. Default applies the application property, DispMgrAspectRatio.
If scaled, the larger of the page contents or the defined page size will be scaled to fit the operator's screen. The Idea Studio is not affected by this property.
Automated display scaling works reasonably well when enlarging the page. It cannot do as good a job when shrinking a display for a smaller screen. In particular, labels embedded within buttons or widgets are more likely to be truncated than scaled down.
Always design for the smallest screen that the application will be displayed upon. Further information is provided in Size Pages for Differing Screens
Manage Parameters, Parameter Values
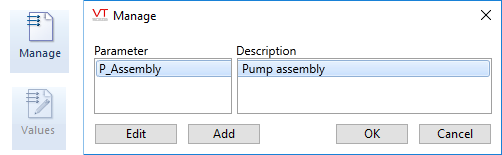
By parameterizing a page, you can re-use the same page for similar sets of tags. For example, one control page can be used for a series of stations, if each station has the same hardware. See: Parameterized Pages
The Values button is enabled only when the page has parameters. When editing a page, widgets and other items that are linked to parameters may not be displayed unless a tag has been chosen for, or a value has been assigned to the parameter. Click this button to open the Manage Parameters dialog, where you may assign values to be used during the current editing session.
The Manage Parameters dialog will always be displayed when opening a parameterized page for editing, or when the navigational link to the page does not have values assigned to the page's parameters.

Use this to apply an existing custom privilege to the page, thereby denying access to everyone who does not have that security privilege. (Note that security cannot be applied to widgets.)
If custom privileges have not yet been created, or if security has not been activated, this menu provides access to the security accounts and privilege dialogs, for developers who are authorized to access those dialogs.
