Edit a Tag Widget
At the code level, a widget is very similar to a page. Both can be edited within the Idea Studio using exactly the same tools. In fact, it can be difficult to tell whether you are editing a page or a widget. The easiest way to check is to note the icon used in the tabs at the bottom of the Idea Studio.
![]()
There's an icon for each type of page and widget
That and the toolbar ribbon...

Don't ignore the ribbon title
There are two ways to open a widget for editing in the Idea Studio:
- Use the Open command, then select the widget.
The Open command is available from the File menu, the plus button, and the keyboard combination Ctrl-O. - Right-click on a custom widget within a page then choose Edit from the pop-up menu.
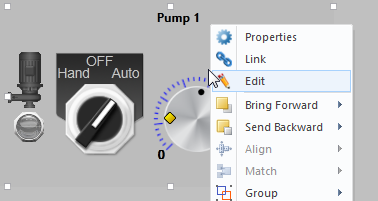
Right-click menu for a custom widget, within a page, within the Idea Studio.
When editing one of your custom widgets, everything you do goes into effect immediately, changing all instances of that widget on all pages.
Reference Point
The reference for every widget is the upper left corner. This is 0,0 in the Idea Studio's coordinate system. Do not move the pieces of a widget away from this corner unless you want every instance of that widget to jump to a new location.
Equally important: Never scale the pieces of a widget while editing unless you want every instance to scale. Results can be unexpected.
Tag Icon Marker
Most VTScada widgets contain a tag icon marker.
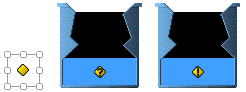
The Tag Icon Marker in a VTScada widget (Color Fill)
A Tag Icon Marker can be added to user-created tag widgets automatically. For it to function, the tag to which the widget will link, must have at least one of the properties, "Questionable" or "ManualValue".
In the case of user-created tag widgets for tags that do not have either of those properties, there is no benefit to adding the Tag Icon Marker.
Tools in the Widget Properties Ribbon

Tools in the Widget Properties ribbon
Many of the sections are shared with the Page Properties ribbon, with options that do not apply to widgets disabled. As shown, you can adjust the background color (this doesn't affect the drawn widget, but can be useful if your widget will normally be placed on a dark background) or change the title if the original name isn't suitable.
Of particular note are the tools Tag Types and Drawn Context.
Tag Types
A new tag widget can be linked only to tags like the one to which the original was linked. It is standard practice to expand this list to include similar types. For example, if the original was linked to an Analog Status tag, you may also wish to be able to link new instances of the widget to Analog Input, Calculation, and other tags with numeric values.
To link your widget to other tag types:
- Within the Idea Studio, open the widget for editing.
Use the Open command in the file menu, press Control-O, or right-click on a drawn instance of a widget and select Edit from the pop-up context menu. - Select the Widget Properties ribbon.
- Click the Tag Types button in the Widget Properties ribbon.
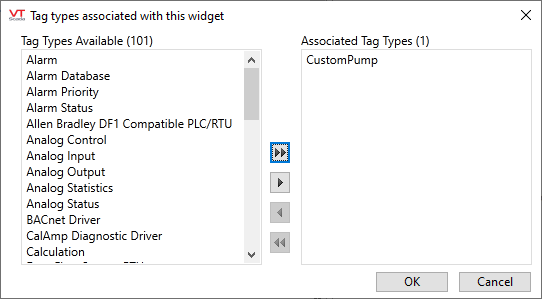
The Edit Parameters dialog opens. - Use the arrows to fill the column on the right with all the tags that you might want to link to your widget.
Troubleshooting:
- The Widget Properties ribbon is not visible.
The Widget Properties ribbon is visible only when editing a widget. Use the Open command to open a widget for editing.
Drawn Context
The Drawn Context is used only within the Idea Studio. It does not create a permanent link to any tag so far as the definition of the widget is concerned. It does allow you to select one tag to be used to provide values for display within the Idea Studio. This is extremely helpful as it provides context for everything you see as you edit the widget.
Linked Tag Properties
The objects you selected when creating a tag widget were linked to tags. After grouping, the link changes from a specific tag to a type of parameter called a "linked tag property". This is a very powerful concept that gets it's own chapter.
