Tag List Widget
Used by: Context Tag, Analog Statistics tag, Digital Statistics tag, Station tags.
* Does not use the Style Settings tag.
The Tag List widget provides a highly configurable means of displaying any or all of the child tags attached to a selected parent. If no parent tag is selected, then root of the tag hierarchy is considered to be the parent and any set of tags in the application can be displayed in the list, subject to the configuration of the filtering options.
The Analog Statistics tag is composed of a number of History Statistics child-tags. The Digital Statistics tag is composed of Counter, History Statistics and Totalizer child tags. All of these child types hold numeric (analog) values.
Use this information in the Tag List configuration when selecting the widget and the types to display using that widget.
The Tag List will display each type of child tag using any of the standard widgets available for that type. For example, the Analog Status tags in the list may be displayed using a Meter4 widget while the Pump Status tags are shown using an Image Change widget.
To make the most effective use of the Tag List Widget, you are advised to create a custom widget that will include all the information to be shown in each row of the list. For example, the Tag List widget could show a set of Analog I/O tags using Numeric widgets, but operators would not be able to tell which number matches which I/O until they hover over a number to see the tool tip. A better solution would be to create a widget that includes all the information for a station, laid out in a row, beginning with the name of that station. Use text (ordinary label text) above each column to identify the content in each column.
The Tag List can be filtered and sorted to select and organize which tags will be included. Also, the list itself may be configured to control where the widgets are placed within it and how it will handle multiple pages when there are too many tags for the configured display area.
The steps shown here outline the general procedure to configure a Tag List Widget. Detailed steps for each part of the procedure are provided in following topics.
- Determine the type of the parent tag for which you want to draw a Tag List.
- Open the Widgets palette within the Idea Studio.
- Open the folder for the selected parent tag type.
- Drag a Tag List from the palette onto the current page.
- Link the Tag List to the parent tag.
- Open its Properties dialog.
- For each of the tag types to be included in the display, select the tag type, then select which widget will be used to display that type in this list.
Note that you are not limited to types for which tag instances exist. You can configure the Tag List so that tags that are added later and that match the selection filter will be displayed automatically. - [Optional] Many widgets can be used by more than one type of tag. If other tag types are to use the same widget chosen in step 2, select those types from the Available Tag Types list and click the arrow button to move them to the Selected Tag Types list.
- [Optional] Adjust the display options of the selected widget by clicking the Properties button.
- For the remaining tag types that you wish to include in the Tag List, repeat steps 2 through
- Click the Filter/Sort tab.
- [Optional] Restrict which tags in the structure will be included in the list by using the Filtering options.
- [Optional] Sort the tags shown in the Tag List display.
- Click the Table Layout tab.
- Adjust the appearance of Tag List as required.
- Click on OK.
Basic Components\Multi-Variable\
Tools\Standard Library\
Tools\Report Tools\
Tag Types\Organization/Containers\Context
If you select a Context tag to draw, the Tag List is the default widget.
- Select a Context tag in the Tag Browser.
- Click Draw, or right-click on the tag and select Draw.
- Select the Tag List.
- Click on the page to locate the lower-right corner of the list.
A Tag List can be drawn for any parent tag, or for all tags in the application.
- Open the Idea Studio.
- Access the Widgets palette.
- Expand the Tools folder, then the Standard Library folder.
- Drag the Tag List to the page.
- Link to a parent tag, or open the Properties dialog to select a tag type and a list of widgets.
Next task: Select widgets for the list.
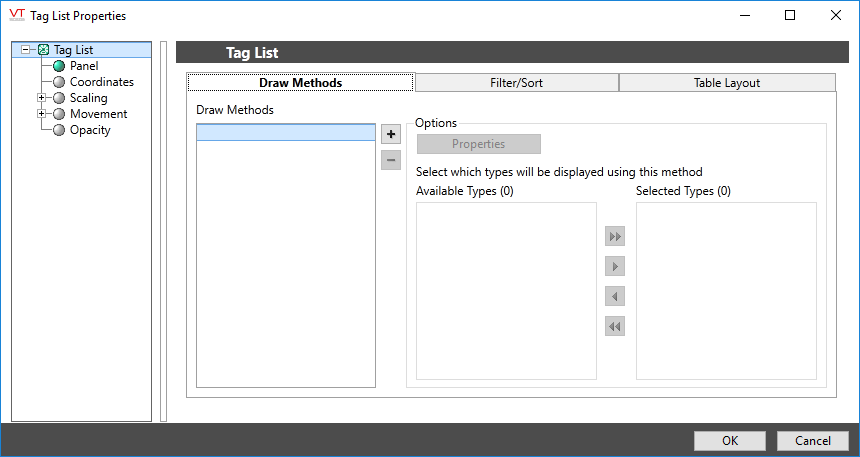
- Click the plus sign beside the Draw Methods list.

The Widget Selection dialog opens.
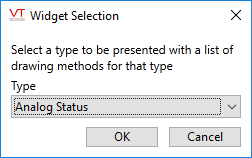
A widget is chosen by first selecting the tag type to be drawn. With that information, VTScada can provide a list of the available widgets for the chosen tag type.
- Select the appropriate tag type from the drop-down list.
This should be the next tag type that you intend to display in the Tag List widget.
A list of the available widgets for that tag type will be displayed. Only one method may be used in the Tag List for each tag type.
- Select the appropriate widget.
The Widget Parameters dialog will open. This is a condensed version of the properties dialog that would normally be displayed when using the selected widget.
- Set the display parameters that will be used by all instances of this widget in the Tag List display.
At a minimum, this will include the standard three operator controls: Disable Trend, Disable Navigation or Disable Tooltip.
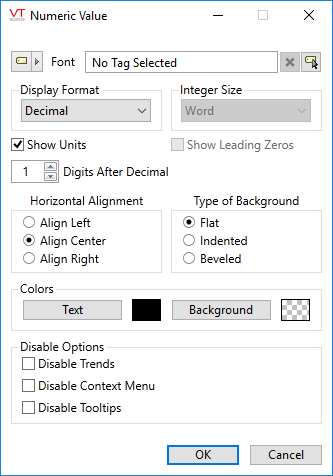
- Click OK.
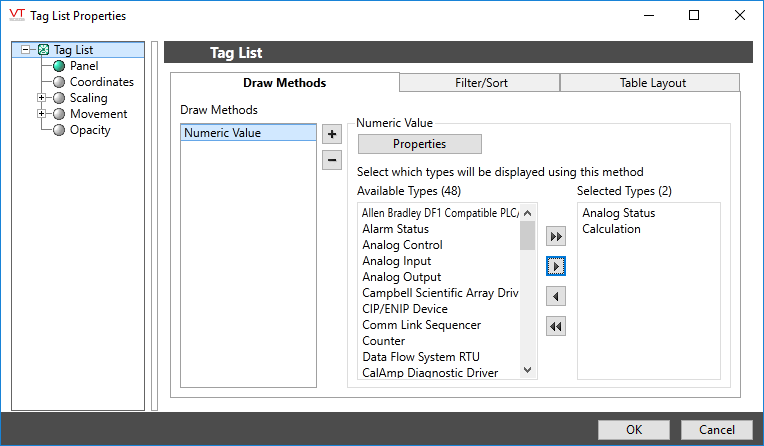
The tag type that you used to select the widget will be displayed using this method in the Tag List. This is the tag type shown in the Associated Tag Types list.
It is possible that other tag types could also be displayed using this widget. These are the items in the Tag Types Available list.
Next task: Filter and sort the display.
Unless otherwise filtered, all the tags in the parent-child tag structure, that have had a widget selected for their tag type, will be included in the list. You may use the filter options to limit the list to only those tags that are of interest to you.
The first filtering option is "Immediate Children Option". This is selected by default, restricting the display to only those tags one level below the selected parent.
If deselected, then all the tags in the tag structure (that have an associated widget from the previous tab and that are not otherwise excluded by the configuration of the filter) will be included in the Tag List.
Name Filter:
Using the wildcard character, *, enter a pattern to restrict the Tag List to only those tags whose Name property matches the pattern.
Example: "Pump*" - all tags whose name begins with the letters "Pump".
Area Filter:
Using the wildcard character, *, enter a pattern to restrict the Tag List to only those tags whose Area property matches the pattern.
Example: "*zone" - all tags whose area property ends with the letters "zone".
Equipment Type:
If the Tag List displays I/O and Calculation tags, select one of the equipment types used for those tags from the drop-down list.
Expression Filter:
Using the VTScada Expression language, you can create a filter that restricts the Tag List based on tag property or combination of properties. For example: \Units == "FT". This will limit the selection to those tags whose engineering units are "FT".
Note that, if filtering for a value you must use \Root\Value. All other properties can be referenced by simply \PropertyName, but \Value must be preceded by \Root.
You can create complex filters such as "all analogs and all inputs", thereby excluding analog I/O tags that are outputs. The expression would be:
\CheckTagGroup(\Root, "Analogs") && \CheckTagGroup(\Root, "Inputs")
... to get the intersection of the two groups.
Useful groups for the IO tag are Analogs, Analytics, Digitals, Inputs, Outputs, Loggers, Numerics, and Strings.
You could also filter for the I/O tag's mode, but use care: The mode that you see when configuring the tag is a phrase, so that it can be translated in the case of a multi-lingual application. Rather than filter for a mode such as "Analog" or "2-bit Digital", your expression must match the phrase label.
\Mode == "AnalogLabel"
Phrase labels used for the mode parameter include: AnalogLabel, DigitalLabel, DiscreteLabel, Digital2BitLabel, CalculationNumLabel, CalculationStrLabel, and StringLabel.
Sort the Tag List Display
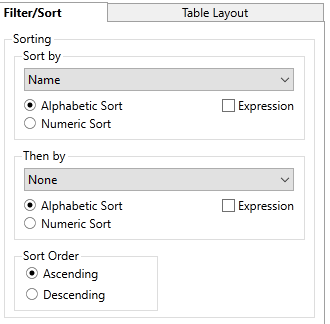
By default, the items in the Tag List will be sorted by name. Using the controls shown here, you may sort the list by other parameters, and may also perform a sub-sort. For example, you might sort the tags by area, then within each area sort by name.
You can also choose whether to sort the list alphabetically or numerically, and in ascending or descending order.
The available fields for sorting are Name (tag name), Area, Tag Type and Draw Method. You can also create an expression that returns a string or a number, to sort based on any tag property. Examples of expressions for sorting include, \Value, \Description, and \Units.
Next task: Configure the tag list layout.
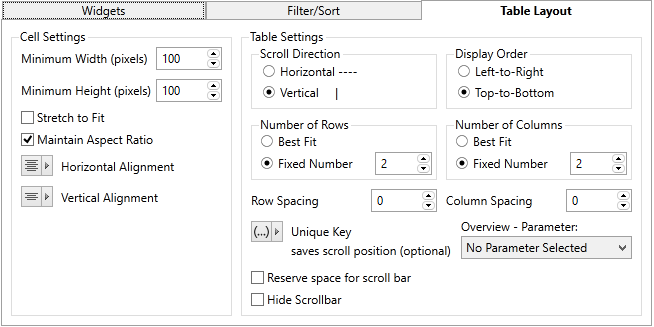
Cell Settings
Each tag in the list, displayed using the selected widget, counts as one cell.
You may set the following options for the cells:
Minimum Width and Height
Measured in pixels. Sets the smallest size that each cell may be. Cells may be as large as required. A widget will not necessarily fill its cell unless you have selected "Stretch to fit".
Stretch to fit.
The widget in each cell will be scaled to fit the cell size.
Maintain Aspect Ratio.
If stretched, determines whether the widget will be stretched equally in width and height.
Horizontal and Vertical Alignment options.
Sets the widget's position within its cell, in the event that the widget does not fill the cell. The default options are to center the cells within the Tag List, both horizontally and vertically. Some users may prefer a table that is left-aligned with entries that start at the top, filling downwards.
Table Settings
Scroll direction
If there are more tags to display than will fit within the area of the Tag List, a scroll bar will be added and the operator can page through the tags. This option controls whether the list scrolls from top to bottom or from left to right.
Display Order
For the tags that fit within the Tag List's area, the order of display - left to right or top to bottom, are controlled by this option. This option is affected by the sorting order selected in the previous tab.
Number of Rows and Number of Columns.
Sets how many rows and columns of cells are to be shown in the Tag List's area. Best fit will take the size and number of cells into account to display multiple rows or columns of cells if there is room.
Row Spacing and Column Spacing.
Adds a margin, measured in pixels, between each row or column, should there be more than one row or column in the displayed tag list.
Unique Key for saving the scroll position
Variables such as dialog positions and sizes are normally retained per-user and per-module. What this means for the tag list is that the scroll position would be saved, but shared across all tag lists.
By providing a unique key to this parameter, each tag list drawn in an application can save its own scroll position. If used, the key may be any phrase such as, "Main Station Display" or "Treatment Plant Panel".
If the folder is used in a parameterized page, it will be necessary to have a different key for each version of the page that you open. Therefore, this property may be linked to a page parameter or expression.
Reserve Space for Scroll Bar
When selected, space will be provided for a scroll bar, whether one is required or not.
Cannot be selected when Hide Scroll Bar is selected.
Hide Scroll Bar
When selected, the view is limited to only the top N drawing methods. (Those that fit the available space.) This may be useful in if you wish to display the values of the top 5 tags based on the sorting and filtering you have configured. By configuring grid dimensions such that rows and columns allow space for N widgets, and then hiding the scroll bar, users can display the top N tags while restricting access to subsequent ones.
Cannot be selected when "Reserve space for scroll bar" is selected.
