The VTSX program, provided with the VTScada installation as VICsetup.EXE, provides VIC![]() VTScada Internet Client. Allows you to connect to an application over the Internet with many of the features of a full VTScada workstation. access without the need for Microsoft Internet Explorer or any other program.
VTScada Internet Client. Allows you to connect to an application over the Internet with many of the features of a full VTScada workstation. access without the need for Microsoft Internet Explorer or any other program.
The default installation folder will be C:\Program Files (x86)\Trihedral\. You will probably want to create a desktop shortcut to the executable file, VTSX.EXE, but note that the user interface itself contains an option to create that shortcut for you. The steps are provided in the next topic.
Assuming that a VTScada Thin Client Server has been configured to make your application available over the Internet, then the connection process is as follows:
The VTScada Internet Client (VIC) is not compatible across versions before and after 11.5 / 12.0. If connecting to an 11.5 / 12.0 server, you must use the 11.5 / 12.0 client. If using the 11.3 or earlier server, you must use a pre-11.5 client.
Clients will function, but symbols and certain characters will not display properly.
- Run the VTSX program.
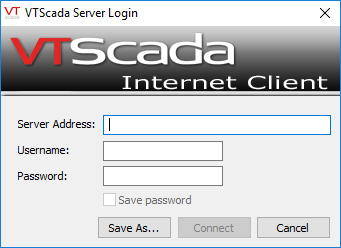
The VTScada Server Login dialog appears.

- Enter the Server address and realm name. The protocol portion, "HTTPS://" is optional.
If not using a secured connection, you must use the protocol specification, "HTTP://"
For example: https://vtsdemo.trihedral.com/exceldemo
- Enter the username and password for an account that has been granted the Thin Client Access privilege.
The Connect button will be enabled.
- Click on Connect.
The "Establishing Server Connection" dialog will be displayed while the application opens on your computer. In the case that a connection cannot be made, an error dialog will be displayed to describe the source of the problem.
The Save As... button can be used to store a link to the VTSX program, including the server address, as a shortcut on your desktop. Double-click the shortcut to create a new connection to your application.
Optional items to include in the server address:
Page Name: Following the realm name, you might choose to include a page name. If so, add it following the realm.
Example: https://vtsdemo.trihedral.com/exceldemo/anywhere/alarm
Save a shortcut to the VTSX program.
To simplify the process of making future connections to a Thin Client Server, you can save the connection information as a shortcut on the desktop. Double-click on the shortcut to re-open the VTScada Server Sign-in dialog, preconfigured with the saved information.
To create the shortcut:
- Create the link file with URL & username (2) launch lnk file, type in username make connection, bookmark session - over writing lnk file. (3) launch lnk file from bookmarked session, enter password, and again save and overwrite lnk file.
- After filling in the connection information fields of the VTScada Server Login dialog, click the "Save As…" button.
- Launch the program by double-clicking the link.
- Type in your username to make the connection.
- Bookmark the session, overwriting the link file.
- Close the session.
- Launch again using the link.
- Enter your password.
- Save, again overwriting the link file.
You can edit the shortcut as required. In particular, some users might prefer to select a given server rather than allow the client to connect automatically to the first available from the defined server list. To do so, open the shortcut's properties dialog and select the Shortcut tab. In the Target string identify the -s parameter, which stores the server list.
Alternatively, you can create a VIC shortcut containing the client's full server list by accessing the system menu (i.e. the Windows menu that contains Move, Size, Minimize, Maximize, and Close) on the main VIC's window while connected and select the "Bookmark Page"
Copies of the shortcut file can be distributed to users throughout your site.
Security Notes for Saved Passwords
If you choose to save the password for your account in the shortcut file, then anyone who has access to your Windows account on this computer may access the application.
Passwords are saved using the standard Windows™ password caching policy. Under this policy, saved passwords are protected by the user authentication credentials for the Windows user account. That is, after a user has signed in to a workstation, any passwords saved for that user on that workstation are automatically filled in for dialog boxes requiring them. Password theft is mitigated by encrypting the stored passwords using a key unique to that user and that workstation. Any other user on that workstation cannot use saved passwords for another user on that workstation and cached encrypted passwords cannot be transferred to another workstation.
Troubleshooting
- No connection is made.
- Ensure that you are providing a fully qualified domain name, beginning with HTTPS://.
Use HTTP:// if not using a secured connection. - There may be issues related the configuration of your company's firewall. Check with your IT department.
- Ensure that you are providing a fully qualified domain name, beginning with HTTPS://.
- It seems to create a connection, but access is denied.
- You may not have Internet Access privileges, or you may not be allowed to connect to the named realm. Check with your manager.
