Customize Columns in Alarm Displays
The structure of lists in the Alarm Page and in Alarm List Widgets is controlled by the XML file, C:\VTScada\VTS\AlarmListFormats.XML. You may decide to customize the structure for any of the following reasons:
- Add or remove columns in a list.
- Set the default width of columns.
- Add customized columns to a list.
- Add a customized list format.
Do not edit C:\VTScada\VTS\AlarmListFormats.XML. Your changes will be lost with your next VTScada update.
Do not copy this file to your application folder. Local definitions of column formats and list formats that you have not customized will prevent updates from taking effect.
To make the customizations described in this topic, create a file named AlarmListFormats.XML in your application folder. The structure must be as described in this topic. You may copy sections of \VTScada\VTS\AlarmListFormats.XML to use as a template, but do not save any definition that you do not intend to customize. Your custom definitions will override or be added to those from the VTScada file.
The structure of the file is as follows:
<?xml version="1.0" encoding="ISO-8859-1"?>
<AlarmList>
<ColumnFormats>
<Format name="SingleSet1">
<Column width="160">AlarmCellTimestamp</Column>
... more column definitions ...
</Format>
... more format definitions ...
</ColumnFormats>
<ListFormats>
<Format name="AlarmStandard" label="AL_StandardFormatLabel">
<list name="History" label="AL_HistoryListLabel">
<Single>SingleSet1</Single>
<Double>DoubleSet1</Double>
</list>
... more list definitions...
</Format>
... more format definitions...
</ListFormats>
</AlarmList>
XML Format Hierarchy:
- ListFormat definitions are linked to user-interface tools, and are selected according to rules coded into that tool. Examples follow.
- Within each ListFormat will be one or more lists such as Active, Current, etc.
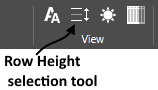
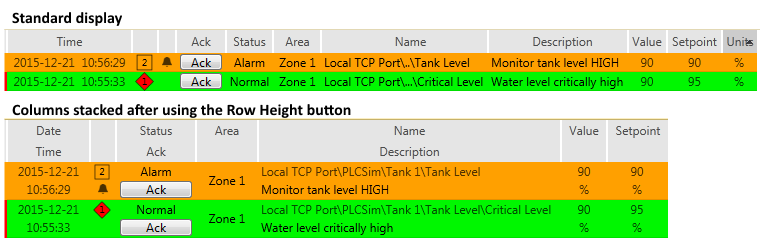
- Each list definition within each ListFormat will contain two versions, Single and Double. This selection is controlled by the operator by toggling the Row Height option.
- The single version and the double version each specify a ColumnFormat.
- Two ListsFormats may each contain a list with the same name such as "History", but these are separate definitions. Different column formats can be specified for History (and any other list) in different ListFormats.
- ColumnFormats specify the display modules to be shown in the column cells, the order of the columns from left to right and the default width of each column.
For example, an alarm popup uses the "PopupStandard" list format, which contains only one list: "Unacked". In the Alarm Page, the default is to show the AlarmStandard format, containing History, Active, Unacked, etc, but if an operator chooses to view only the System Event DB, then the "EventStandard" list format will be selected automatically limiting the selection to just the History list.
Application properties are used to set the text used for the labels of lists and columns in the user interface. For example:
AL_HistoryListLabel = History
The column widths specified in the XML file are the initial default widths only. After the alarm list has been viewed by a user, the widths are retained for that user. Any further modifications to the column sizes in the XML file will affect only new users who have never viewed the alarm list.
To test the column sizes, you muse either sign in as a new user, or delete the retained files and reload the page. To delete the retained files, follow these instructions:
- Switch to a different page so the alarm list isn't being displayed
- Using a file explorer, navigate to the application's \Data\Retained folder
- Filter this folder by *DrawAlarmList-AlarmList-ColWidths*
- Delete all the files that match the filter
- Switch to the page with the alarm list - the column widths should now match what is in the XML file
Column Format Definitions:
The set of lists shown in the Alarm Page is predefined, but you may alter the appearance of any list.
For each list, History, Active, etc. two sets of column formats are defined. Two are required so that the operator may use the Row Height button to switch between a list with one item per column and a list with (in some cases) two.
In the ColumnFormats section of the XML file, these are given generic names. The display name is set in the second section of the file. An example of the format follows:
<?xml version="1.0" encoding="ISO-8859-1"?>
<AlarmList>
<ColumnFormats>
<Format name="SingleSet1">
<Column width="160">AlarmCellX</Column>
<Column width="26">AlarmCellY</Column>
...
</Format>
<Format name="DoubleSet1">
<Column width="26">AlarmCellX</Column>
...
Each "<Format" section sets the columns to be included. Columns are displayed in the list from left to right in the order found in the Format section.
The width sets the default size to be used by that column. Changes to column widths by the operator are stored on a per-operator, per-session basis, overriding your defaults. There are three ways to specify the width of a column:
- Column width = "30". Sets the specific number of pixels to be used by the column.
- Column width = 30%. This column will occupy 30% of the area remaining after the columns with specific width settings have been accounted for. The total of percentages should be 100 or less. See next option.
- No width specification. All columns with no width specification will share equally the space remaining after columns with a specific or percentage width have been accounted for.
The example text, "AlarmCellX", "AlarmCellY", etc. must be replaced, either by one of the VTScada modules provided to format and display the contents of each cell in an alarm list, or by a module of your own creation. See link under Related Information.
Example 1:
For the standard alarm page display of unacknowledged alarms, move the name and description to the first column.
This will require a change of the ColumnFormat ordering, but the first step is to discover which ColumnFormat is used by the Unacked list in a standard display. Fortunately, the names in the XML file make this easy to find:
Under <ListFormats> find <Format name="AlarmStandard" ...> You can safely assume that this is the standard format. Within that section, find the list named "Unacked":
<list name="Unacked" label="AL_UnackedListLabel">
<Single>SingleSet2</Single>
<Double>DoubleSet2</Double>
</list>
From the above, it is clear that ColumnFormats SingleSet2 and DoubleSet2 are used. These can be copied from the original file, together with enclosing XML specifiers and reordered. The file you save to your application as "AlarmListFormats.XML" should look like the following. Only the two column formats are being overridden in your application. All others will continue to use the default XML file. Don't forget to import file changes to add your version of the XML file to the application.
<?xml version="1.0" encoding="ISO-8859-1"?>
<AlarmList>
<ColumnFormats>
<Format name="SingleSet2">
<Column>AlarmCellName</Column>
<Column>AlarmCellDescription</Column>
<Column width="26">AlarmCellPriority</Column>
<Column width="160">AlarmCellTimestamp</Column>
<Column width="50">AlarmCellAck</Column>
<Column width="18">AlarmCellIcon</Column>
<Column width="80">AlarmCellAction</Column>
<Column width="140">AlarmCellArea</Column>
<Column width="90" extra="1">AlarmCellValue</Column>
<Column width="90" extra="1">AlarmCellSetpoint</Column>
<Column width="70" extra="1">AlarmCellUnits</Column>
<Column width="18">AlarmCellNote</Column>
</Format>
<Format name="DoubleSet2">
<Column>AlarmCellDoubleNameDescription</Column>
<Column width="26">AlarmCellDoublePriority</Column>
<Column width="83">AlarmCellDoubleTimestamp</Column>
<Column width="18">AlarmCellIcon</Column>
<Column width="80">AlarmCellDoubleActionAck</Column>
<Column width="140">AlarmCellArea</Column>
<Column width="90" extra="1">AlarmCellDoubleValue</Column>
<Column width="90" extra="1">AlarmCellDoubleSetpoint</Column>
<Column width="18">AlarmCellNote</Column>
</Format>
</ColumnFormats>
</AlarmList>
The "extra" attribute, when present and set to 1, enables the visibility of the column to be toggled by the Show/Hide Extra Columns tool.
There is also an "alwaysShowShelved" attribute. For example:
<list name="Shelved" label="AL_ShelvedListLabel" alwaysShowShelved="1">
This attribute, when true, enables records that are marked as "shelved" to appear in the list even when the "Show Shelved Alarms" tool is not toggled.
Example 2:
Remove a column from display, such as the device history (AlarmCellDevice) column.
- Create an AlarmListFormat.XML in the application
- Create empty <AlarmList> and <ColumnFormats> sections.
- In the <ColumnFormats> section, copy and paste the SingleSet1 and DoubleSet1 formats from the original
- Modify SingleSet1 and DoubleSet1 by removing the AlarmCellDevice column
There is no way to customize the standard Alarm Page on a per-user basis. Instead, to allow admins to see the device column, they will need to draw the Alarm List widget on a page and configure it to use a custom format. They can secure this page so that only admins can see it. To create the custom format, do the following:
- Edit the AlarmListFormat.XML in the application
- In the <ColumnFormats> section, copy and paste the SingleSet1 and DoubleSet1 formats from the original and rename them, e.g. MySingleSet and MyDoubleSet
- Create a <ListFormats> section below the <ColumnFormats> section
- In the <ListFormats> section, copy and paste the AlarmStandard format from the original and rename it, e.g. MyAlarmFormat
- In the MyAlarmFormat format, for the History list, rename SingleSet1 and DoubleSet1 to MySingleSet and MyDoubleSet
The result will be similar to:
<AlarmList>
  <ColumnFormats>
    <Format name="SingleSet1">
 ...copied from original, but with no device...
    </Format>
    <Format name="DoubleSet1">
 ...copied from original, but with no device...
    </Format>
    <Format name="MySingleSet">
 ...copied from original and including the device...
    </Format>
    <Format name="MyDoubleSet">
 ...copied from original and including the device...
    </Format>
  </ColumnFormats>
  <ListFormats>
    <Format name="MyAlarmFormat" label="Droplist Title">
      <list name="History" label="HistoryLabel">
        <Single>MySingleSet</Single>
         <Double>MyDoubleSet</Double>
      </list>
      <list name="Active" label="ActiveLabel">
        <Single>MySingleSet</Single>
        <Double>MyDoubleSet</Double>
      </list>
      <list name="Unacked" label="UnackedLabel">
        <Single>MySingleSet</Single>
        <Double>MyDoubleSet</Double>
      </list>
      <list name="Current" label="CurrentLabel">
        <Single>MySingleSet</Single>
        <Double>MyDoubleSet</Double>
      </list>
      <list name="Shelved" label="ShelvedLabel" alwaysShowShelved="1">
        <Single>MySingleSet</Single>
        <Double>MyDoubleSet</Double>
      </list>
      <list name="Disabled" label="DisabledLabel" alwaysShowShelved="1">
        <Single>MySingleSet</Single>
        <Double>MyDoubleSet</Double>
      </list>
      <list name="Configured" label="ConfiguredLabel" alwaysShowShelved="1">
        <Single>MySingleSet</Single>
        <Double>MyDoubleSet</Double>
      </list>
    </Format>
  </ListFormats>
</AlarmList>
What is entered in the quotes after 'label=' is the text that will appear in the widget drop list. This is the Phrase ID that will appear in the language file. If there is no entry in the language file the text will show.
In the Alarm List widget drawn on the protected page, select MyAlarmFormat so admins can see the device column that the standard Alarm Page cannot see.
