Configuring the Service
Now we will incorporate our service into a VTScada application and configure it. First, create a new, standard VTScada application. Do not enable remote configuration yet. Set the start page title to be "Test Service" and the start page file name to be "TestServ".
We want create a VTScada page that displays the innards of our service, just so we can see what is going on. Edit the "Pages\TestSrv.SRC" file to be like the following:
[
  Title = "Test Service";
]

Main [
  Return(Self);

    { RPC status }
  System.Edit(40, 110, 180, 70, "RPC Status:",
               \SampleService\ServiceMode, 0);

    { Server name }
  System.Edit(230, 110, 370, 70, "Server:",
               \SampleService\CurrentServer, 0);

    { Sequence Error Counts }
  System.Edit(40, 210, 180, 170, "Sequence Errors:",
               \SampleService\SequenceErrors, 0);

    { Sequence Numbers }
  System.Edit(40, 260, 180, 220, "Sequence Act:",
               \SampleService\LastHeartbeatCount, 0);
  System.Edit(230, 260, 370, 220, "Sequence Exp:",
               \SampleService\HeartbeatCount, 0);
]
A better way of doing this would be to interactively drop an instance of a widget that displays the required information, on a page. The creation of widgets is outside the scope of this document however, so the above will be sufficient for now.
Adding a module declaration to the VTScada application’s AppRoot.SRC file incorporates the service into the application. Suppose that the service code above is contained in file SAMPSERV.SRC. Then the AppRoot.SRC may appear as follows:
[
  Constant POINTS        = 0x0002     { Point template class                };
  Constant GROUPS        = 0xFF00     { Collections of point types          };
  Constant LIBRARIES     = 0xFF01     { Library class module                };
  Constant GRAPHICS      = 0xFF02     { Shared widgets for points   };
  Constant PAGES         = 0xFF03     { Graphic pages & dialogs             };
  Constant SERVICES      = 0xFF04     { Service class                       };
  Constant PLUGINS       = 0xFF05     { Plug-in class                       };
  Constant PRIORITYSTART = 0xFF06     { Items that are pre-started          };
  Constant TSERVICES     = 0xFF07     { Threaded service class              };


  [ (POINTS)        {========= Modules that are point templates ===========}
  ]

  [ (GROUPS)        {==== Modules that are collections of point types =====}
  ]

  [ (LIBRARIES)     {======== Modules that contain library objects ========}
  ]

  [ (GRAPHICS)      {= Modules that are shared widgets for points =}
  ]

  [ (PAGES)         {===== Modules that are graphic pages and dialogs =====}
    TestSrv Module "Pages\TestSrv.SRC";
  ]

  [ (SERVICES)      {===== Modules that are services that are started =====}
    SampleService Module  "SampServ.SRC";
  ]

  [ (PLUGINS)       {===== Modules added to other base system modules =====}
  ]

  [ (PRIORITYSTART) {===== Modules/variables that are to be prestarted ====}
  ]

  [ (TSERVICES)     {====== Modules that are threaded services to run =====}
  ]
]
Note that VTScada has already added a similar line for the initial page that we added.
Before we can use the service, it is necessary to inform VTScada which machine, or machines are potential servers for the service. This is normally done in the application’s Servers.XML file. A typical Servers.XML for our simple application might look like this:
<?xml version="1.0"?>
<RPC>
   <ServerLists>
      <Service Name="Default Server Lists">
         <Workstation Name="Default for Workstations">
            <Server>FREDSPC</Server>
         </Workstation>
      </Service>
   </ServerLists>
</RPC>
In our simple example, we have only one potential server, "FREDSPC", for all workstations and all services. All other machines that run this service will be clients to FREDSPC. You should use the workstation name of the machine that you wish to be the server, instead of FREDSPC. The application properties dialog provides the Edit Server Lists panel as a graphical interface for editing this XML file.
Now compile the application and run it. If all has gone well, you should see a display similar to the following: (navigation and title bar will vary by VTScada version)
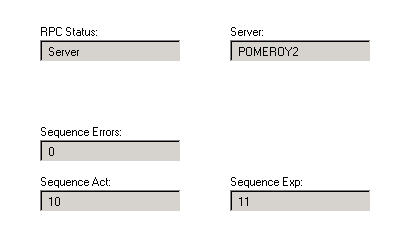
Next we will enable remote configuration. That way, when you bring on one or more clients, the remote configuration service will ensure that subsequent code changes you make on the server will be correctly propagated. Start up the server instance again. On another machine, which will be a client, acquire and run the application. You should now have a server and a client that will maintain the simple numeric synchronizable state, no matter how you disrupt communication between them, or stop and start the application.
You can repeat the last step to add more and more clients, if you wish.
