Animated graphics are an ordered series of individual graphic images, each of which differs from the last by a small amount. When viewed in rapid succession, the visual effect of the differences will appear as motion to the human eye.
For those doing development over a VIC thin client, note that it is not possible to select alternate images for your animation in this environment.
The image and the folder in which they are stored must share a name. You must save each image with a consecutive suffix such as a, b, c, or 1, 2, 3... For example:
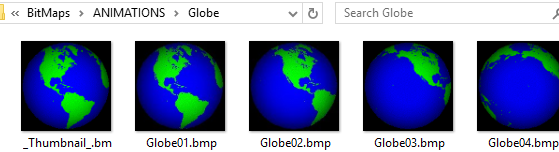
You should also create one image to represent the animation. Name this "_template". Images may use any of the formats recognized by VTScada.
Create the images folder within your application folder. Import the images into your application.
- If the folder exists elsewhere on your workstation, use the Select Images button in the Animated Image widget properties dialog. This will copy the folder to your application and import the images in one step.
- If you place the folder under your [ApplicationName]\Bitmaps\Animations folder, use the Import File Changes button in the VAM to let your application know that the files exist.
You might also want to create a new palette entry for your custom animation. This is not necessary, but it is convenient.
Use a custom animation
- Create a folder filled with the images that will combine to make the animation.
See notes elsewhere in this topic on Image File Details. - If that folder is located in your [Application Name]\Bitmaps\Animations folder, use the Import File Changes button in the VAM. Otherwise proceed.
- In the Idea Studio, drag any animation to a page and link it to one of your tags.
Widgets folder >> Basic Components >> Images >> Animations. - Open the properties dialog for the widget and click the Select Images button.
- Browse to the folder containing the images.
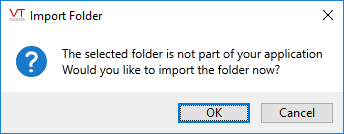
If the folder is not part of your application, the following prompt appears. Click OK.
Create a palette shortcut for your animation.
Assuming that you have already imported the images in your custom animation folder...
- In the Idea Studio, ensure that the Widgets palette is open and browse to the folder, Basic Components >> Images >> Animations.
- Copy and paste any one of the existing menu entries.
- Open the properties of the copied menu entry.
- Change the title to match your animation.
- Click the Set Parameters button to open the Animated Image dialog.
- Select the folder in which your animations are stored.
- Adjust other properties as preferred.
- Save the menu entry.
Image File Details:
There are two parts to a VTScada animated image:
- The directory it is stored in.
- The file names used by the still images.
All should share a common root file name. Use any of the file formats recognized by VTScada.
Your VTScada application will not use new files and folders until they have been imported by someone who has the Edit Files privilege.
For example, if you were creating an animation named "Bounce" you would first create a sub-folder of the application's Bitmaps\ANIMATIONS folder with that name.
C:\VTScada\YourApp\Bitmaps\ANIMATIONS\Bounce
Always store custom images within your application directory structure, or the OEM folder on which your application is based.
The still frames of the animation are a series of image files that you save to the Bounce folder.
The color black (#000000) is treated as transparent in VTScada. Do not use pure black in your animation's images for any visible area.
The images are ordered by adding a sequence character (A, B, C …) after each file name. For example:
C:\VTScada\YourApp\Bitmaps\ANIMATIONS\Bounce\BounceA.png
C:\VTScada\YourApp\Bitmaps\ANIMATIONS\Bounce\BounceB.png
C:\VTScada\YourApp\Bitmaps\ANIMATIONS\Bounce\BounceC.png
Copy the first image, renaming it to _Thumbnail
C:\VTScada\YourApp\Bitmaps\ANIMATIONS\Bounce\_Thumbnail.png
The sequence character can be a letter or number. File names are not case sensitive.
Use a minimum of three still frames to create an effective animation. The longest animation that comes with VTScada has 18 frames. Most have four to six.
