Add a Property
There are two methods for adding a property: To add a property to the Settings.Dynamic file, it is easiest to use the Insert button in the Application Configuration dialog.
If adding a property to the Settings.Startup file, or if you are adding a property to a hidden section, then you should use a text editor to work directly in the file.
The Application Configuration dialog will add properties only to the .Dynamic file. Any property that belongs in .Startup must be added using a text editor and then the changes imported. (Import File Changes Tool)
Existing properties in either file can be changed using the Application Configuration dialog.
Another reason that you might add a property is if you wish to override a configuration setting from the file Setup.INI. Most commonly, this will be done to re-define a VTScada label within an application.
Notes:
- Property names may not include the following characters []<>=;
- Properties must be added within the correct section, otherwise they will be ignored.
Steps to add a new property using the Application Configuration dialog:
- Open the Application Configuration dialog and select the Edit Properties page.
- Click on the Insert button
The Add Property dialog will open.
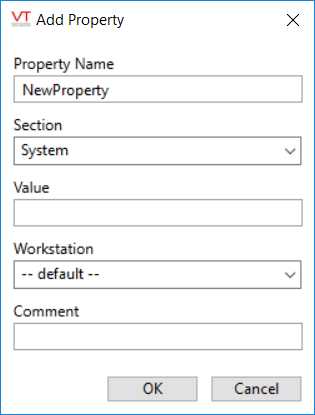
- Enter the Property Name.
- Select or Enter a section.
Properties will be ignored if they are added to the wrong section of the Settings file.
- Enter a value for the property
- [optional] Select a workstation if this property is to be in effect on only that one.
- Enter a comment, describing the new property.
Comments will be stored on the line below the property in the Settings.Dynamic file.
- Click OK
The dialog closes. Note that the new property will not be saved until you apply your changes.
- Click Apply.
The Comment dialog will appear.
- Type a comment into the Comments dialog and click OK.
This comment is for the VTScada version control system and should explain why the new property is being added, unlike the earlier comment that explains what the property does.
Steps to add a new property using a text editor:
- Start a text editor that does not add formatting to your document.
- Open or create the file that the property should be added to.
- Use Settings.Startup for properties that require a re-start.
- Use Settings.Dynamic for hidden security manager properties.
- Use WorkstationName.Startup or WorkstationName.Dynamic in the WorkstationSettings sub-folder for properties that apply only to a specific workstation.
- Locate the appropriate section name for the property.
Section names are enclosed in square brackets. Each property listed in the reference section of this chapter will identify the section it must belong to.
- Add the property using the format, PropertyName = Value
- Add a comment to the following line using the format, ; Comment describing property.
Comments must not be included on the same line as the property definition. Comments on the same line will be taken as values for the property.
- Save the file
- In the VAM, click Import File Changes, or (better) use the Import/Export Files page of the Application Configuration dialog to import the new or edited file.
The Import/Export Files method is preferred because it enables you to review all changes in the file before proceeding with the import.
- The new value has no effect.
Check that the property name is spelled correctly and that a legal value has been assigned.
Check that the property has been declared in the correct section.
Ensure that comments are not included on the same line as the property declaration.
Ensure that the file changes have been imported.
If the property requires a re-start, shut down the application and re-start it.
Change a Property's Value - Control the appearance or behavior of your application.
