Edit Properties with the Advanced Mode
While the Basic mode is useful, many more properties can be found by clicking the Advanced Mode button at the lower-right of the Edit Properties dialog. This changes the view to a list of all properties in effect for this application, including those configured in OEM layers. These give you extensive control over how your application looks and works.
These notes do not attempt to describe each of the over 1000 properties available. You are encouraged to refer to the property reference section of the VTScada documentation to explore the options.
To switch from Basic Mode to Advanced mode, look for the button at the lower right of the Edit Properties dialog.

Advanced mode button
... Changes the display to...

Edit Properties - Advanced Mode
The Application Configuration dialog will add properties only to the .Dynamic file. Any property that belongs in .Startup must be added using a text editor and then the changes imported. (Import File Changes Tool)
Existing properties in either file can be changed using the Application Configuration dialog.
Gray font / Black font?
Properties displayed in a black font are defined in the current application and can be edited there. Properties displayed in a faint gray font are defined in a lower layer. These OEM properties affect your application but cannot be modified within it.

Gray versus black font in the Properties list
To override a gray (OEM) property, select it, then use the Copy button to copy it to your application. After copying, you can change the local instance to the value you want. Changes made to that property in the underlying application will no longer affect your application.
Tools for the Advanced Mode
The following tools are available to help you work with the property list in the advanced mode:
- "Hide OEM Properties" removes all but the local properties from view.
- Filter the list by entering a portion of a property name and the * wildcard, then press enter or press the filter button. For example, enter Disp* to find most Display Manager properties.
- Sort the list by clicking on any column header. Reverse the sort order by clicking a second time.
Property Attributes
Every property has seven attributes, which can be seen in the seven table headings. These are:
Property Name
Simply, the name of the property. Must be a single word.
Most properties are described in the Reference chapters of the VTScada documentation.
Section
Every property must belong to a section. These cannot be assigned randomly. VTScada will ignore any property definition that is located in the wrong section (with a few exceptions).
Most of the properties that you will want to work with are in the section, [System]. Any new properties you create should be added to that section.
Value
All properties are stored as text, including those written out as numbers.
Some properties are set to blank. In most cases, blank means "use the default", which might mean, "don't use this feature".
Workstation
You can define properties whose value applies only to the named workstation. These will be saved in files named for the workstation. AutomaticDeploy is an example of a workstation-specific property.
Restart
If a property has a check mark in this column, then any change to that property will require the application to be restarted before the change will take effect.
Properties that require a restart are stored in the file Settings.Startup. All other properties are stored in the file Settings.Dynamic. You cannot use the Edit Properties dialog to add new properties to the .Startup file; they must be added directly to that file using a text editor and changes imported before they can be edited within the dialog. (See: Import File Changes Tool)
When you click the Apply Changes button to save a property that requires a restart, no further development work can be done in the application until that restart occurs. Therefore, choose your timing of such changes carefully.
OEM
Any property with a check mark in the OEM column will also be gray. These are defined in an underlying application layer.
To override any of these properties, you must copy them to the current application.
Comment
An optional description of the property.
When working directly with the configuration files, this must be stored on the line below the property definition or it will be taken as part of the value. Comment lines begin with a semicolon.
Change (or add) a property value in the advanced mode:
The general steps are as follows:
- Open the Application Configuration dialog.
- Open the Edit Properties page in the Advanced Mode.
- Find the property...
- You can search using wild cards. Also, the list can be sorted by name, type, or value for browsing.
- If you find the property and it is black, you can edit it directly.
- If you find the property and it is gray, you must use Copy to copy it from the OEM layer to the current application.
- If the property is not listed, click the Insert button to add it.
- Change the property's value.
- Apply the changes.
You may need to deploy the change if Automatically deploy local changes is not selected in the "Other" tab of the basic mode.
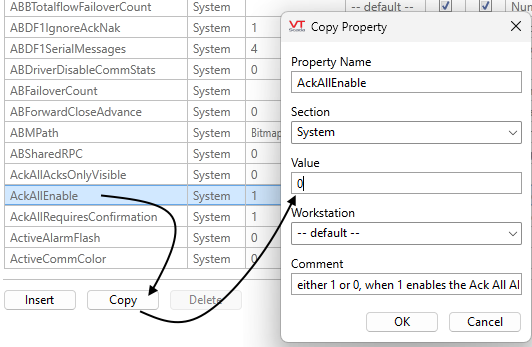
Copying a property
Click to expand image
Widgets to change a property value
If you need to change the value any property on a regular basis, it may be inconvenient to open the Application Properties menu. Instead, you can use an Edit Property Checkbox or an Edit Property Field to modify that property on any of your pages. This may be especially helpful when you need to allow an operator to change a property but do not want to grant Application Configuration rights to the operator's role or account.
