Configure Time Columns
 See Also
The Report Studio is still under development and has not officially been released. Be warned that code may change such that reports you create with this pre-release trial version might need to be updated in order to continue working after your next VTScada update.
Until the official release, documentation for the Report Studio will open in response to the F1 key but will not be shown in the menu system. To view a table of contents for the complete chapter, navigate to The Report Studio
All tables start with a single column. Click the [+] bar to the right to add more.
Note that a tag query that includes multiple tags or calculations will generate as many columns as needed to display the result of the query.
Time values (where the data set type is "Time") are typically displayed in column A of a table. This recommended because summary labels (if summaries are used) are always placed in the first column and therefore work best below time values, which are never summarized. You are free to choose any column for time and might choose to have several time columns if the format differs or if you want to repeat the timestamp in a report with many columns.
The Time data cell type is recommended for reports with aggregated data. A separate Time column may not be needed if creating an Alarm & Events report.
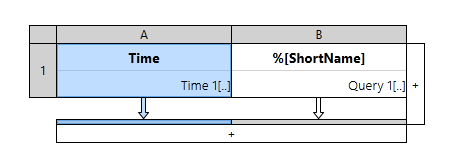
Whether configuring time or a query, start by clicking in the title row as shown following to open the Data Cell Properties panel.

Select column A to define a time-based data set
Actions for a Time data set type:
Delete the column
Click the trash can icon in the header of the Data Cell Properties panel. This deletes the column from the table but does not delete the data set definition.

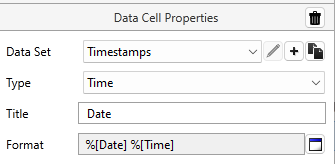
Select or create a Data Set
Every "time" column definition, every tag query, every recipe batches query and every alarm and event query is stored as a named "Data Set". You are advised to give each a descriptive name because it is likely that you will eventually have many.
A predefined data set named "Timestamps" is provided. You are free to create more if different reports should display date and time values in different ways.
- Click the pencil button to allow editing of the data set's properties.
- Click the plus button [+] to create a new data set with a name of your choosing.
- Click the copy button to clone a data set.
Select a Type
Must be set to "Time" for this to be a time / date column.
You are advised not to change your "Timestamps" data set to become a tag query.
Define a Header
Text displayed at the top of the column. Defaults to "Date". Replace with any other wording that is appropriate.
Select a Date Format and Time Format
The format for time and date can be edited by making a parameterized phrase.
Click on button to the right of the field to open the Parameterized Phrases dialog. Multiple formats are available for selection, or you can enter a format of your own using the available Date Formatting Strings and Time Formatting Strings.
