Adding Notes to Reports
The Report Studio is still under development and has not officially been released. Be warned that code may change such that reports you create with this pre-release trial version might need to be updated in order to continue working after your next VTScada update.
Until the official release, documentation for the Report Studio will open in response to the F1 key but will not be shown in the menu system. To view a table of contents for the complete chapter, navigate to Report Building (Report Studio)
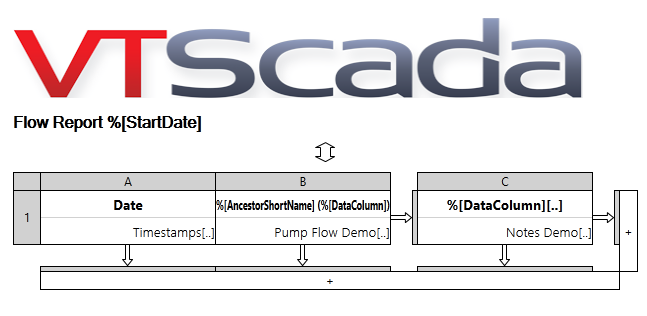
All tables start with a single column. Click the [+] bar to the right to add more.
Note that a tag query that includes multiple tags or calculations will generate as many columns as needed to display the result of the query.
Retrieve information from Notebook tags to include in reports. A report can exclusively display Notebook data, but more commonly this Data Set is added to a report to give context to values from other Data Sets.
Create a Data Set
In the Data Set Manager, click [ + ] , select the correct Type from the drop list and give your Data Set a name. You may cultivate a selection of Data Sets in a single report configuration so you should opt for a descriptive name.
Click OK and the Data Set Properties will open on the right-hand side.
If you navigate away and want to get back to this properties panel, click on the Data Set in the manager.
Notes Data Set Properties

|
Delete the Data Set The trash can located in the header of a Data Set Properties panel will delete the Data Set. If you delete a Data Set that is being used by components or other Data Sets, they will stop working until you revisit their properties and select a suitable replacement. Before deleting, double check the header: Are you deleting a Data Set? Or a Data Cell? Name The name of your Data Set is displayed in this field. To change the name, edit the field. Context [Optional] Context can be used in two ways:
|

Select a Notebook tag
You have the option of selecting a tag from the tag browser or selecting a report parameter. When using the Tag Selector, remember to use the 'Select Tag' or 'Add Query' buttons to add your selections before clicking OK.
Available Data Fields
Selected Data Fields are directly related to the columns that will appear in a table. Re-ordering the options using the arrows beneath will reorder the columns in the table. There must always be at least one data column for every Data Set.
- Operator- The username that was logged in to the application when the note was submitted.
- Original Timestamp- The timestamp from when the note was submitted. Recommended when displaying 'Whole Thread'.
- Last Updated- The timestamp from the most recent comment left on a note.
- Note- The contents of the note, the message.
- Tag Name- The name of the notebook tag.
- Note ID- All notes, including comments, have their own GUID (Globally Unique Identifier).
- Parent Note ID- The GUID
 Globally Unique Identifier. of the parent note. This value appears with note entries that are 'comments' nested under parent notes.
Filters
Narrow down the notes that appear in a report by configuring Filter settings. Some filters can be configured by text string or parameter. You can add and manage report parameters from the Parameter section in the ribbon. Add, modify and delete parameters from here, and optionally configure default values.

The icon on the left manages parameters. The icon on the right manages their values.
- Note- Text or Parameter. Narrow down notes by a fragment of text or custom parameter. You can also make this case sensitive and choose whether or not to include comments.
- Operator- Text or Parameter. Narrow down notes by Operator.
- Display- Droplist. "Note Only" (default) only includes parent notes, not comments. "Whole Thread" displays all notes including comments. With "Whole Thread" selected, comments will appear under their parent note. Threads are coalesced this way to make it easier to see how events unfolded. Including the "Original Timestamp" data column is recommended. The parent note will have a timestamp sequential to the report record timestamps, but comments may have been added to the parent note at any time. Original Timestamp will show when subsequent comments were actually submitted.
Maximum Records
Optionally, set a maximum record limit for notes that appear within a report.
You cannot add Notes data set with a pivot table. Existing Notes columns will be dropped if you switch to a Pivot configuration. You may include Notes in a Transpose table, they will appear grouped together in relation to the location of the row on the canvas.
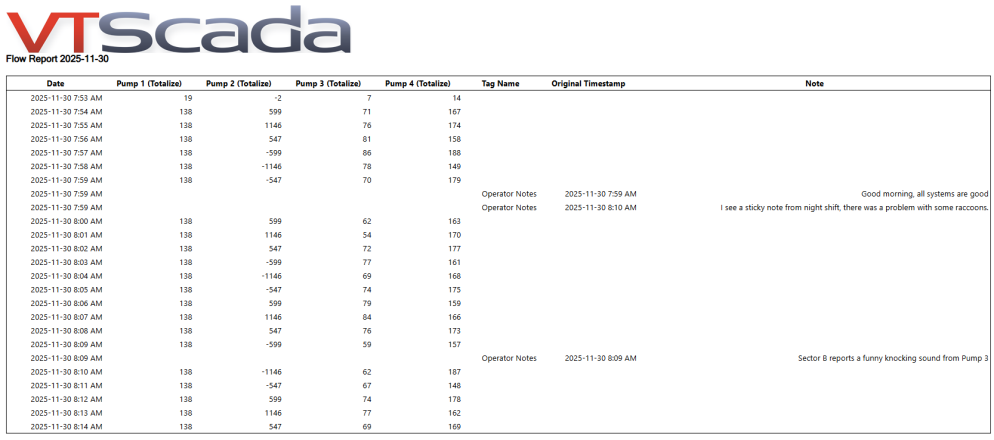
Sample Report with Notes
The same report includes a Timestamp column that shows one record per minute over a custom timespan, a Tag Query column displaying data from I/O & Calculations tags, and Notes from the Operator Notes default Notebook tag.
The Notes dataset has been configured to display the Whole Thread and include data columns "Tag Name", "Original Timestamp" and "Note".
The second note is a comment that was added to the"Good morning..." parent note. Notice how the Original Timestamp is out of sync with the Date column in the report? Threads are coalesced to keep the conversation together. Including Original Timestamp preserves the timeline.