
Not counted towards your tag license limit.
The Report tag provides most of the features of the Reports Page, plus two extras:
- It will trigger automatically on the interval you specify (perhaps every morning at 8:00).
- It adds an offset to the time periods. For example, you could set the time period to be the Last Hour but offset such that data is for the hour ending 15 minutes before the report runs.
Report tags do not allow for multiple iterations on reports.
A record is added to the events history each time a report is generated using the Report Tag. Use this to verify that automated reports were created on schedule.
The Report tag need not be drawn to function. If drawn, you can show it as a time display, showing when the report was last run. You can also draw it as a button, allowing operators to run the report at a time of their choosing, or to repeat a missed report (a configuration option of the report button widget).
Worth noting: The Report Tools Library provides a number of widgets you can place on a page to allow an operator to adjust the report, without needing to grant tag configuration privileges.
The value of the Report tag will be 1 when writing a report and 0 otherwise. When viewed in the Tag Browser, the address of the report will be the configured report type. ("Analog Summary Report", "Hourly Snapshot Report", etc.)
When running VTScada as a Windows service, DO NOT select Excel as an output destination or option from a Report Tag. As noted in the MSDN forums, office applications assume they are being run under an interactive desktop. If Excel attempts to open a modal![]() A modal dialog is always displayed on top of the calling window and prevents further interaction with that window. dialog from a non-interactive service, the result is an invisible dialog that cannot be dismissed, stopping the thread.
A modal dialog is always displayed on top of the calling window and prevents further interaction with that window. dialog from a non-interactive service, the result is an invisible dialog that cannot be dismissed, stopping the thread.
Besides the technical problems, you must also consider licensing issues. Microsoft's licensing guidelines prevent Office applications from being used on a server to service client requests, unless those clients themselves have licensed copies of Office. Using server-side Automation to provide Office functionality to unlicensed workstations is not covered by Microsoft's End User License Agreement (EULA).
Before configuring an email destination for a report, you must configure VTScada so that it can access your email server.
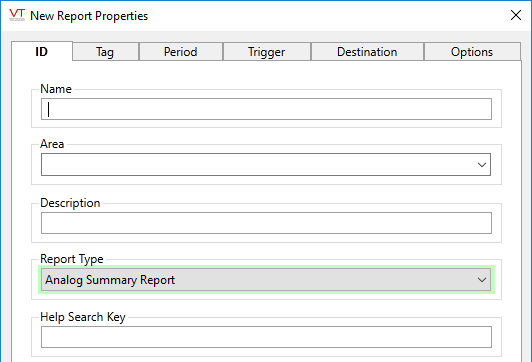
The Report tag's ID tab has an extra field: Report Type
The Report Type drop-down list should be used to select the type of report that you want to generate using this tag. This may be one of:
- Daily Snapshot Report
- Daily Total Report
- Driver Communication Error Detail Report
- Driver Communication Summary Report
- Hourly Snapshot Report
- Hourly Total Report
- Standard Report
Other fields are standard for an ID tab...
The ID tab of every tag includes the same common elements: Name, Area, Description, and Help ID.
Name:
Uniquely identifies each tag in the application. If the tag is a child of another, the parent names will be displayed in a separate area before the name field.
You may right-click on the tag's name to add or remove a conditional start expression.
Area
The area field is used to group similar tags together. By defining an area, you make it possible to:
- Filter for particular tag groups when searching in the tag browser
- Link dial-out alarm rosters to Alarm tags having a particular area
- Limit the number of tags loaded upon startup.
- Filter the alarm display to show only certain areas.
- Filter tag selection by area when building reports
When working with Parent-Child tag structures, the area property of all child tags will automatically match the configured area of a parent. Naturally, you can change any tag's area as required. In the case of a child tag, the field background will turn yellow to indicate that you have applied an override. (Orange in the case of user-defined types. Refer to Configuration Field Colors)
To use the area field effectively, you might consider setting the same Area for each I/O driver and its related I/O tags to group all the tags representing the equipment processes installed at each I/O device. You might also consider naming the Area property for the physical location of the tag (i.e. a station or name of a landmark near the location of the I/O device). For serial port or Roster tags, you might configure the Area property according to the purpose of each tag, such as System or Communications.
You may define as many areas as you wish and you may leave the area blank for some tags (note that for Modem tags that are to be used with the Alarm Notification System, it is actually required that the area field be left blank).
To define a new area, type the name in the field. It will immediately be added. To use an existing area, use the drop-down list feature. Re-typing an existing area name is not recommended since a typo or misspelling will result in a second area being created.
There is no tool to remove an area name from VTScada since such a tool is unnecessary. An area definition will exist as long as any tag uses it and will stop existing when no tag uses it (following the next re-start).
Description
Tag names tend to be brief. The description field provides a way to give each tag a human-friendly note describing its purpose. While not mandatory, the description is highly recommended.
Tag descriptions are displayed in the tag browser, in the list of tags to be selected for a report and also on-screen when the operator holds the pointer over the tag’s widget. For installations that use the Alarm Notification System, the description will be spoken when identifying the tag that caused the alarm.
The description field will store up to 65,500 characters, but this will exceed the practical limits of what can be displayed on-screen.
This note is relevant only to those with a multilingual user interface:
When editing any textual parameter (description, area, engineering units...) always work in the phrase editor. Any changes made directly to the textual parameter will result in a new phrase being created rather than the existing phrase being changed.
In a unilingual application this makes no difference, but in a multilingual application it is regarded as poor practice.
Help Search Key
Used only by those who have created their own CHM-format context sensitive help files to accompany their application.
Use tools within this tab to select tags to include in the report. Use the Type and Area filters to limit the number shown in the "available" list. Note that, if using either of the pump-related reports, the type filter will automatically choose the Pump Status type. You may switch to the Digital Status type for these reports.
Tag selection sets must be saved as a named group before you may proceed to the remaining configuration tabs.
In an application with many tags, it can be challenging to select those tags in this dialog.
Instead, use the Report Page, where there is much more space, to select your tags and save named groups. Then, you need only use the Load Group button when configuring reports with this tag.
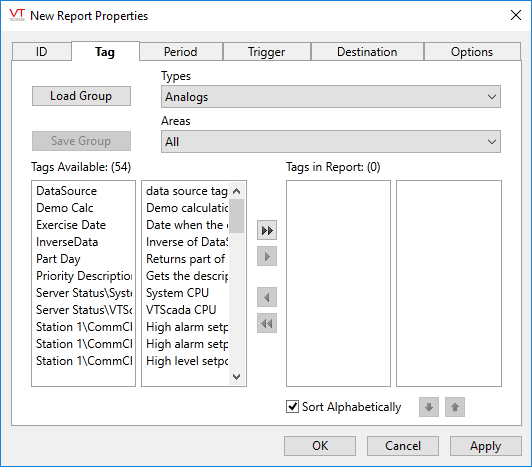
Options for tag selection. Sets must be saved as a group.
Load Group
The Load Group button enables you to load a set of tags that has previously been saved. A loaded tag group can then be used to generate a new report based on your application's requirements. Step-by-step instructions can be found in Saving and Loading Tag Groups for Reports:
Save Group
The Save Group button enables you to save the tags that have been configured for this report as a group that can later be reused for report generation. Step-by-step instructions can be found in Saving and Loading Tag Groups for Reports:
Types
Use this drop-down list to select the type of tags you wish to include in this report.
The Types drop-down list is set automatically according to the setting of the Report Type drop-down list on the Report tag's ID tab. You will rarely need to change it.
Areas
The Areas drop-down list enables you to filter the tags to be included in this report by their Area property.
Tags Available
The Tags Available list displays the names and descriptions of those tags that are available for inclusion in the reports to be generated by this tag. The < button enables you to move a selected tag (or tags) between the Tags Available list and the Tags In Report list. The << button enables you to move all tags in the Tags Available list to the Tags In Report list.
Tags In Report
The Tags In Report list displays the names and descriptions of those tags you have selected to be included in this report. The > button enables you to move a selected tag (or tags) between the Tags In Report list and the Tags Available list. The >> button enables you to move all tags in the Tags In Report list to the Tags Available list.
Use the Period tab of the Report Tag properties folder to select a preset time period or configure a custom time period for the report to be generated by this tag. Note that the Report Button widget
Last versus Previous:
The terms "Last" and "Previous" mean different things in the context of a report. "Last" refers to a time period ending at present (or at a defined end time if defining a custom period). "Previous" refers to the most recent full period where weeks end on Sunday night, days end at one second before midnight, and hours end one second before the top of the hour.
For example, suppose that the current time is 3:25 p.m. on a Tuesday. "Last 24 hours before trigger time" refers to the period from 3:25 p.m. Monday until 3:25 p.m. Tuesday.
"Previous calendar day" refers to the period from 12:00 a.m. Monday until 11:59 p.m. Monday.
"Current" refers to the time frames such as "so far today" or "so far this week".
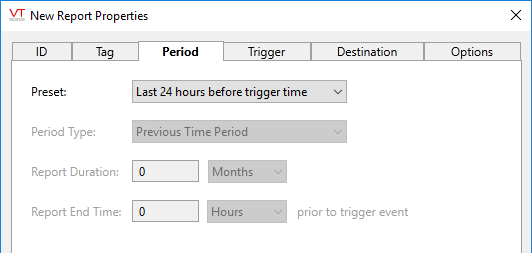
Presets
The Presets drop-down list can be used to select a preconfigured period of time for the data to be included in this report.
If Custom is selected, further options will be available.
Period Type
The selection offers a choice between Previous Time Period or Duration and End Time.
Previous Time Period:
Select a time period (Days, Weeks, etc.) from the drop down list and enter a number in the field provided. "Previous" refers to the most recent time period, ending at a standard boundary such as the midnight, etc.
Duration and End Time:
Sets the length of time that should be included in the report, ending at a set length of time prior to the trigger event.
Select a trigger that will generate the report. A variety of timing options are available, or you can link to any tag that will change in value from zero to non-zero as the trigger. (For example, an Alarm tag or a Trigger tag.)
You may also leave the selection as "No Trigger" and draw this tag as a button that operators can press to generate reports on demand.
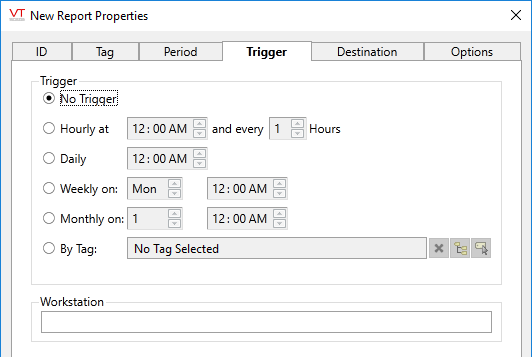
Schedule an automated report run
Trigger
The Trigger radio buttons enable you to select an event that will prompt the generation of this report. This can be one of:
- No Trigger
- Hourly at. (repeats every X hours, beginning at the specified time)
If X is 3, a specified time of 12:00, 3:00, 6:00 or 9:00 would all produce exactly the same result. You do not need to provide the earliest interval in the day.
If the system is offline when a report interval is due, that interval will simply be missed.
- Daily Trigger (at a user-defined time)
- Weekly Trigger (on a user-defined day at a user-defined time)
- Monthly Trigger (on a user-defined date at a user-defined time)
- By Tag (when the value of a specified tag changes from false to true). The Trigger Tag field is not enabled unless the By Tag radio button has been selected.
Trigger Tag
The Trigger Tag field enables you to select any tag with a numeric value whose value will be used to generate this report (when the value of the selected tag changes, the report will be generated). The Trigger Tag field only becomes enabled when the By Tag radio button is selected.
Right-clicking the name of the tag that has been selected in the Trigger Tag field opens the tag properties folder for the selected tag.
Workstation
The Workstation field enables you to enter the name of the workstation upon which this report will be generated. By default, the Workstation field is set to the name of the local workstation.
Report properties Destination tab
When running VTScada as a Windows service, DO NOT select Excel as an output destination or option from a Report Tag. As noted in the MSDN forums, office applications assume they are being run under an interactive desktop. If Excel attempts to open a modal![]() A modal dialog is always displayed on top of the calling window and prevents further interaction with that window. dialog from a non-interactive service, the result is an invisible dialog that cannot be dismissed, stopping the thread.
A modal dialog is always displayed on top of the calling window and prevents further interaction with that window. dialog from a non-interactive service, the result is an invisible dialog that cannot be dismissed, stopping the thread.
Besides the technical problems, you must also consider licensing issues. Microsoft's licensing guidelines prevent Office applications from being used on a server to service client requests, unless those clients themselves have licensed copies of Office. Using server-side Automation to provide Office functionality to unlicensed workstations is not covered by Microsoft's End User License Agreement (EULA).
Use the Destination tab to configure an output format and destination for the report. All options from the Reports page can be found here. Available options will change according to the selected output type.
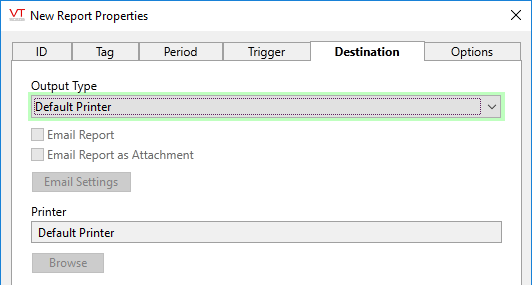
Email must be configured in the Alarm Properties dialog
Output Type
The Output Type drop-down list enables you to select the format to be used to display this report. This can be one of:
- Default Printer: Prints the report to the printer configured for your PC under the Windows operating system.
- Printer: Enables you to specify the path to a printer other than the default printer configured for your PC under the Windows operating system.
- Text File: Generates the report as a plain, unformatted text file with the extension .TXT. This option enables the transmission of report data in the body of an email message (see, "Email Report").
- Screen Display: Generates the report in a window on your screen. This format enables the use of a Microsoft Excel template file to modify the way your report appears. Please refer to "Using a Microsoft Excel Template File to Generate Reports".
A report that has had its Output Type configured as ‘Screen Display’, and for which the ‘Use Excel to Display Screen Reports’ check box has been selected will open as a regular screen display over VIC connections. The ‘Screen Display Using Microsoft Excel’ feature is not available for VIC connections at the present time.
- CSV File: Generates the report as a comma-separated value file with the extension .CSV. Such files are easily imported by a variety of different database software packages. This report output option enables the transmission of report data as an attachment to an email message (see "Email Report As Attachment").
- Formatted Excel XLS File: Generates the report as a formatted Microsoft Excel spreadsheet with the extension .XLS. (The report will feature a bold title and column headings.) This report output option enables the transmission of report data as an attachment to an email message "Email Report As Attachment").
- Plain Excel XLS File: Generates the report as a plain, unformatted Microsoft Excel spreadsheet with the extension .XLS. (Unlike the Formatted Excel XLS File option, the report will not feature a bold title and column headings.) This report output option enables the transmission of report data as an attachment to an email message (see "Email Report as Attachment").
- Access MDB File: Generates the report as a Microsoft Access database file with the extension .MDB. This report output option enables the transmission of report data as an attachment to an email message (see "Email Report As Attachment").
- ODBC Data Source: Enables you to specify an existing ODBC data source associated with an existing ODBC-compatible database file into which you wish the report data to be saved.
Email Report & Email Report as Attachment
When selected, the Email Report check box causes the report generator to email a copy of the report data to a specified address or set of addresses within the body of the email message. The maximum possible number of characters for the address is 255.
The Email option is available with most output types, provided that you have configured an email server.
The following is an advanced option.
In a multi-server environment, you may wish to have only the current System Historian server send the email. Do so by adding a non-optimized parameter expression to the check box. The expression will be similar to \RPCManager\GetServer("SystemHistorian") allowing for variation in the name or names you are using for your historians. (See: Automated Tag Configuration.
Email Settings
After choosing to email a copy of the report, click this button to open the Email Settings dialog, where the recipients, subject, and message for the email can be configured.
Email addresses may be in the basic form, Name@Company.Com" or you may use either of the following longer forms. Multiple addresses may be entered, separated by semi-colons or commas. Do not add spaces within the angle brackets.
"Full Name" <Name@company.com>
Full Name <Name@company.com>
Destination
The destination field's label changes according to the selected report output type.
You may enter a path, printer, or ODBC data source for the report. (A path is not required for Default Printer or Screen Display output types). You may specify a path or printer using either the Browse button to navigate to the desired location, or by manually typing the path into the destination field.
Browse
Opens a dialog with which you can find and select a printer (when Printer is selected in the Output Type drop-down list) or a path to a Microsoft Excel template to be used to generate this report (when Screen Display is selected in the Output Type drop-down list). Instructions on utilizing Microsoft Excel templates to generate reports can be found in Use an Excel Macro Template.
When running VTScada as a Windows service, DO NOT select Excel as an output destination or option from a Report Tag. As noted in the MSDN forums, office applications assume they are being run under an interactive desktop. If Excel attempts to open a modal![]() A modal dialog is always displayed on top of the calling window and prevents further interaction with that window. dialog from a non-interactive service, the result is an invisible dialog that cannot be dismissed, stopping the thread.
A modal dialog is always displayed on top of the calling window and prevents further interaction with that window. dialog from a non-interactive service, the result is an invisible dialog that cannot be dismissed, stopping the thread.
Besides the technical problems, you must also consider licensing issues. Microsoft's licensing guidelines prevent Office applications from being used on a server to service client requests, unless those clients themselves have licensed copies of Office. Using server-side Automation to provide Office functionality to unlicensed workstations is not covered by Microsoft's End User License Agreement (EULA).
This tab includes two options that are not available in the Reports page. You may choose to record an event when the report triggers, and if doing so, log that event using "Report" as the area name. This is recommended as it will give you a way to verify that automatically-generated reports did in fact run.
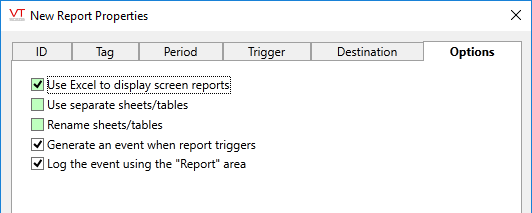
Final display and record-keeping options
Use Excel to display screen reports
The Use Excel to display screen reports check box can be selected if you wish Microsoft Excel to launch your report when the Screen Display report output type is selected.
If you do not select the Use Excel to display screen reports check box, then a simple window will be launched and the report data will be displayed within it.
A report that has had its Output Type configured as ‘Screen Display’, and for which the ‘Use Excel to Display Screen Reports’ check box has been selected will open as a regular screen display over VIC connections. The ‘Screen Display Using Microsoft Excel’ feature is not available for VIC connections at the present time.
Use separate sheets / tables
Multiple iterations are not available to a report tag, therefore this option has no effect.
Rename sheets / tables
Multiple iterations are not available to a report tag, therefore this option has no effect.
Generate an event
When selected, an event will be added to the application's history. Events can be viewed in the Alarm Page by selecting the History display option.
Log the event using the Report Area
The Generate an event option must also be selected. Causes the event to be associated with the system area, "Report". Otherwise, the event will be associated with the report tag's area.
The following widgets are available to display information about your application’s Report tags:
