Create Tag Queries
The Report Studio is still under development and has not officially been released. Be warned that code may change such that reports you create with this pre-release trial version might need to be updated in order to continue working after your next VTScada update.
Until the official release, documentation for the Report Studio will open in response to the F1 key but will not be shown in the menu system. To view a table of contents for the complete chapter, navigate to Report Building (Report Studio)
To include tag values in a report, start by creating a Tag Query Data Set in the Data Set Manager.
Create a Data Set
In the Data Set Manager, click [ + ] , select the correct Type from the drop list and give your Data Set a name. You may cultivate a selection of Data Sets in a single report configuration so you should opt for a descriptive name.
Click OK and the Data Set Properties will open on the right-hand side.
If you navigate away and want to get back to this properties panel, click on the Data Set in the manager.
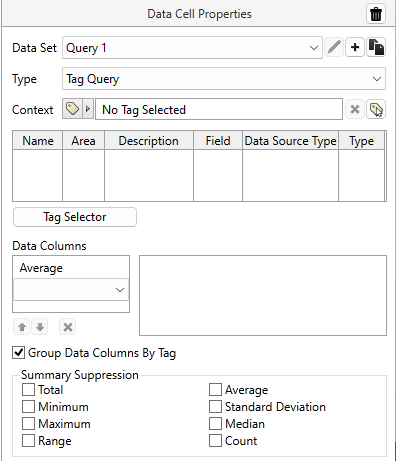
Tag Query Data Set Properties
|
Delete the Data Set The trash can located in the header of a Data Set Properties panel will delete the Data Set. If you delete a Data Set that is being used by components or other Data Sets, they will stop working until you revisit their properties and select a suitable replacement. Before deleting, double check the header: Are you deleting a Data Set? Or a Data Cell? Name The name of your Data Set is displayed in this field. To change the name, edit the field. Context can be used in two ways:
|

Tag Selector
Click on the Tag Selector button to open the Tag Selector Dialog, where you can choose the tags to include in a report. If a Context was set, only child tags of that parent will be shown. The order of the tags in the Tag Selector dialog will affect the order of the columns in the report.
Available Data Fields
There is a lot of information that can be queried from tags. Each enabled option adds a column to a table or a pen to a line chart for each tag included in the query. You must have at least one option enabled.
- Average - Average of all values within the set time per record (time span).
- Minimum*- Smallest of all values within the set time per record.
- Maximum*- Largest of all values within the set time per record.
- Delta - Difference between the largest and smallest of all values within the set time per record.
- Value at Start* - Use for "snapshot" reports. The value at the beginning of each time per record interval.
- Value at End* - Use for "snapshot" reports. The value at the End of each time per record interval.
- Minimum Time - Time within the span when the smallest value was recorded.
- Maximum Time - Time within the span when the largest value was recorded.
- Starts - Number of zero to non-zero transitions.
- Running Time - Length of time when the value was non-zero.
- Totalize - Adds all the recorded values within each time per record.
- Start and End Difference - The difference between the last value recorded and the first value recorded for a time per record.
- Bitwise AND - Should be used only with digital tags (those having a value of 1 or 0) Compares the current row to the previous and returns 1 if both are 1.
- Bitwise OR - Should be used only with digital tags (those having a value of 1 or 0) Compares the current row to the previous and returns 1 if either are 1.
- Raw Data* - Returns all values stored rather than a calculation over the time per record interval. Should not be used in combination with other calculations.
- Runtime Data - A constant value, calculated at runtime. Use this to display any of the following from a selected tag: ShortName, Relative name, Description, Area, Units. The value will be shown in every row.
*Fields compatible with 'Show Display Labels'
Select this check box to display a descriptive label that represents a state reported as a numeric value rather than the value itself. Within a compatible column, labels can be configured to correspond with specific values in the Style Settings tag linked to the tag queried in the report process. Without altering the underlying value, it may be displayed as an Equipment Type, Digital On/Off, or Discrete Multi-State label. If no appropriate label is available or the referenced tag does not have label mapping, the original numeric value is used by default. Display label substitution is only applicable to data rendered by a Table Component.
Count and Transition Count summary values are not replaced with display labels, these values represent amalgamated data rather than states. Most Common State summaries and individual states within State Distribution summaries may be replaced with display labels when matching labels are available.
This option is selected by default for newly added compatible data columns, including those added to an existing data set. This feature is unselected by default for eligible data sets created before this feature was introduced, so that they continue to appear the same as expected.
Summary Suppression
Summary Suppression is used when you have added a summary row to the table but the value doesn't make sense for this data set. For example, summing daily high temperature is not a helpful metric.
Another example of where you might use summary suppression is a pump report that includes a data column for flow characteristics, and a column for pump run time. The first Data Set might be summarized with a Range. The second might be summarized with a total. In this case, you would add two summary rows to your report and suppress them in the opposing data sets.
Group Data Fields By Tag
Given a Data Set with multiple tags and multiple data fields, the default is to order columns by tag.
Pump 1 (Average) | Pump 1 (Min) | Pump 1 (Max) | Pump 2 (Average) | Pump 2 (Min) | Pump 2 (Max)
Uncheck this setting to order columns by data field.
Pump 1 (Average) | Pump 2 (Average) | Pump 1 (Min) | Pump 2 (Min) | Pump 1 (Max) | Pump 2 (Max)
Row Label
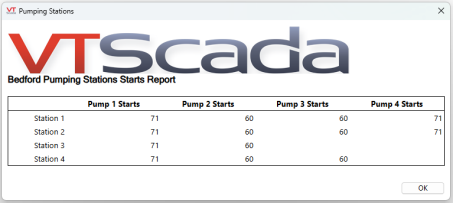
This setting is for use in Pivot Tables Instead of produce a record (and row) for each elapsed time period within the full reporting period, a Pivot Table produces a record for each parent tag of common child tags.
In a Pivot Table, the first row replaces timestamps with labels representing a parent tag.
Add a Tag Query Data Set to a report
Tag queries can be represented in a table or line chart.
To represent tag values in a table, drag and drop a table component onto the canvas. Cell A1 will be timestamps by default, click the [+] to the right to add cell B1. The Data Cell properties will appear to your right. Change the Data Set to a tag query type of your choice.
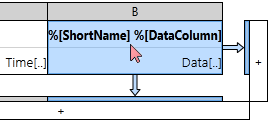
Select column B to define a tag query Data Set
The Data Cell will inherit the parent Data Set configuration by default.
See the Data Fields included from the Data Set. Click to select each one to see how they are configured. You cannot change them while "Use data set defaults" is enabled.
Disabling "Use data set defaults"
To make variations for this cell, uncheck "Use data set defaults". Disabling data set defaults will enable all of the Data Fields configuration options for this cell only.
Select Data Fields to see their configuration options. Change headers, format, and summary suppression. Add, remove or rearrange the data columns.
These changes will only affect the selected Data Cell and will not alter the parent Data Set.
See Create a Report Table and its subtopics for more information.
See Add Line Charts to Reports to learn more about representing tag data in a line chart.
How values queried from tags are calculated for tables and charts
Except for the raw data option, all calculations are performed for time span defined by the component's time per record value. Refer to Time per Record For example, Average will give you the average of all changes in value that occurred over that span, Minimum will give you the smallest value that was detected during the span and so on. This is similar to TPP (Time per point) in the historical data viewer.
Accounting for Rollovers with Start and End Difference data
If Start And End Difference is selected, a Rollover setting appears. You can use this option to account for rollovers when calculating the start and end difference.
This is for hardware that can count to a limited number, then rolls over to start a fresh count. For example, a tag that counts equipment starts, but which can only count from 0 to 15 before wrapping around to start again. This gives a value of sixteen per roll-over since there must be one more start after fifteen to have the roll-over occur. A graph of a very simple case where there is a start every second would look like the following:
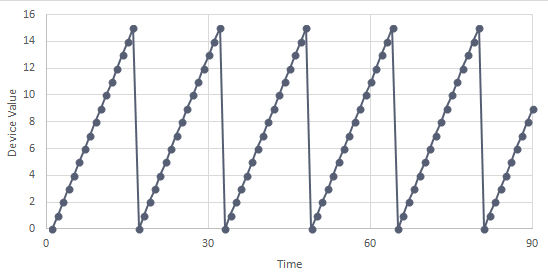
(Each rollover must be followed by a fresh start, not a gradually declining value. If there are a series of declining values then, because each is less than the previous, each counts as another rollover.)
The formula used is (RolloverCount * RolloverValue) + (LastValidValue - FirstValidValue).
Where, for any given time interval:
- Rollovers are counted when a new value is smaller than the last valid value.
- The RolloverValue is passed to the function in the parameter StaleTime.
- LastValidValue starts with the last valid value in the previous time interval (if any), and is updated with each new valid value within the time interval.
- FirstValidValue starts with the last valid value in the previous time interval (if any), and is updated with only the first valid value found in the current time span.
Given this example, suppose that you want a count of starts in each thirty-second interval. In the first interval there is no previous valid value, one wrap-around and a last valid value of 12. (1*16) + (12 - 0) = 28.
This is an idealized case. Consider a more realistic case where not all values are logged. (This may be due to factors such as polling intervals, deadbands, hardware, etc.) The following graph shows the same data where the orange dots represent values obtained and logged and the gray line represents what really happened:
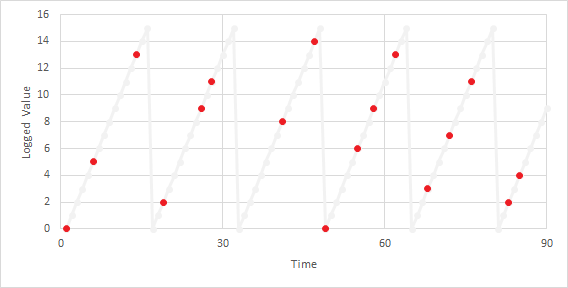
In the first 30 seconds there is one roll-over when the value drops from 13 to 2. The first value is 0 and the last is 11. The Historian will return 27: (1*16) + (11-0) = 27.
The Historian will return 30 for the period from 30 to 60. The first valid value (carried from the previous period) is 11. The last valid value is 9 and there are two roll-overs. (2*16) + (9-11) = 30.
Select Start And End Difference to see the Rollover setting:
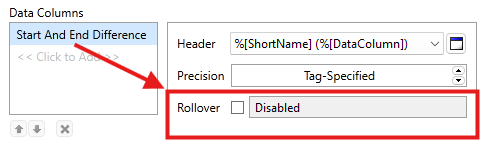
The rollover setting is disabled by default. When enabled but left blank, the field reads "Default's to Tag's Max Value" and it will automatically use the max scaling value configured in the property settings of the tag. Otherwise, you can set a specific value.
