Data Diode Support
VTScada can replicate the historian across Data Diode.
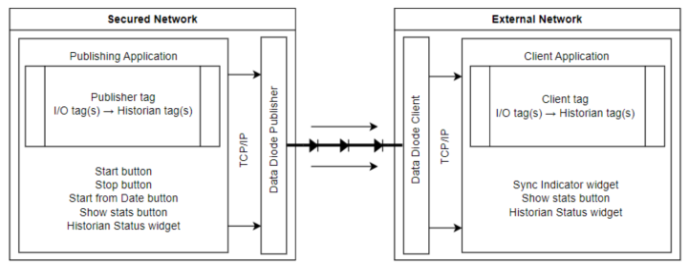
Your Data Diode configuration may resemble the above diagram. The publishing tags and widgets belong in a secured network. The data is transmitted out, to a client tag on the receiving application. There is no means to transmit data into the secured network, effectively isolating it.
A Data Diode configuration requires two VTScada applications, one app on the secured network (publishing side), and one on an external network (client side).
Tag Setup
The app on the secure network must have:
-
A Data Diode Publisher tag with a configured TCP/IP Address and Port Number.
-
At least one Historian tag linked to the Publisher tag.
-
I/O tags linked to the Historian tag(s), generating the data to be transmitted.
The app on the external network must have:
-
A Data Diode Client tag with a configured TCP/IP Port Number.
-
At least one Historian tag linked to the Client tag.
-
I/O tags matching the publishing application configuration.
The Historian tag(s) and any tags being published to the historian tags must be present in both applications and have identical Unique IDs.
Without identical counterparts, incoming data will not display friendly names and you will not be able to plot it to a Historical Data Viewer.
The easiest way to do this is to create the publishing application, copy it and reconfigure the copy to use as the client application.
To use a copy of an application on the client machine, you will need to:
1. Insert a customized workstation-specific setting in the application configuration menu, as described in the Data Diode Publisher tag and Data Diode Client tag sections. This setting links the Historian tag(s) to the Publisher tag on each machine in the Data Diode Publisher tag’s server list.
2. Set the start condition of the Data Diode Publisher tag to make it only enabled on its potential servers. e.g. the start condition can be WKStaInfo(0) == DDPServerMachineName1 || WKStaInfo(0) == DDPServerMachineName2 || .. || WKStaInfo(0) == DDPServerMachineNameN.
3. Repeat the above steps for the Data Diode Client tag.
Any number of Historian tags can connect to the same Data Diode Publisher tag and Data Diode Client tag.
Server Setup
-
The publishing app must be the primary server for the Data Diode Publisher tag and the client app must be the primary server for the Data Diode Client tag.
-
The server list of the Data Diode Publisher tag must be a subset of the server list of the Historian tags. (ie. it cannot include machines that are not in the Historian tag's server list.)
-
There can only be one client server; the server list of the Data Diode Client tag can only contain one machine. If you want to switch to a new machine you must reconfigure the server list to only have the new machine in it and then update the IP address and port number in the Data Diode.
-
You may have a multi-publishing server setup. If the primary publishing server went down, the secondary publishing server would continue to send form where the primary server left off.
To optimize performance it is a best practice to set up the publishing app in such a way that the Data Diode Publisher tag has a dedicated primary server and the historian has a separate dedicated server. Writing to the Historian is a resource-heavy process and having it on a dedicated machine will improve the efficiency of the whole system.
This configuration is not essential but would benefit large-scale systems that produce a lot of history data. This would mean there are at least two servers on the publishing side, apart from any redundancy you may also have.
Security Considerations for your Data Diode Configuration
It is your responsibility to ensure the security of the connections between VTScada and the Data Diode Device.
We strongly recommend your IT department set firewall rules for the port used by the Data Diode Client tag to ensure it only accepts connections from the Data Diode device.
Operation and Monitoring
There is no way for the operator of the client application to communicate back up stream to the publishing application. The appeal of Data Diode is that there is no means of entry. Operators of the publishing application can start transmissions from where they left off, start from a specific date and time, reset the publisher and start from the earliest Historian entry, and stop transmission.
The status of the Historian tags can be monitored, from both ends, through the Historian Status widget. It is recommended that the Client Application use a Sync Indicator widget paired with a Comm Indicator widget to monitor the status of incoming transmissions.
If the server fails on the client app, there is no way for the publishing app to detect it. It will continue transmitting data until the publishing application stops or an operator intervenes. Once the server issues on the client side are resolved, you can back-track by using the Start from Date/Time button to start retransmitting from the date of the last successful transmission.
Start from Date/Time (UTC) will retransmit the data that was transmitted by the Data Diode Publisher from that date/time. It does not retransmit data from that date/time in the Historian.
For example-- If operations were halted on September 10th and resumed on September 20th, then when Data Diode Publisher begins transmitting on September 20th it will start at the first Historian entry after the last one it sent (on September 10th), catch all the way up to the present and continue to transmit new data as it becomes available. If on September 30th you retransmit data from September 20th using Start from Date/Time, the transmission will include all Historian entries from September 10th because those were transmitted by the Publisher on September 20th.
To learn more about Data Diode widgets, see Data Diode Widgets
Normal Sync
On the publishing side, data goes from the I/O tags → Historian → Data Diode Publisher. When data is written to the historian tag, the new records are queued into chunks of data for transmission and tracked from historian to publishing. VTScada keeps track of the last known record published to the Data Diode. As long as a transmission is in progress, new data will flow down this path to the Data Diode Publisher to be published to the Data Diode Client.
The Data Diode Client communicates with the Client Application. On this side, data goes from the Data Diode Client → Historian. The Data Diode Client tag listens at the port and sends data to the Historian for further processing. Tags that share unique IDs in both applications will display friendly names and may be plotted on a Historical Data Viewer. The transmitted data is written to the local storage.
If some records are not what we expected to receive (for example, if they arrive out of order or there are missing chunks) the user would be alerted by the Sync Status Indicator Widget.

The historian will keep a limited amount of transmitted data in memory in case the disordered or missing files are a temporary problem to reduce instances of false alarms.
Bulk Sync
The transmission of data can be manually stopped (with a Data Diode Publisher Stop button) or unintentionally halted in the event of a failover of the publisher server. New data accumulates. When the transmission starts again, it will pick up at the last known transmission and undergo a Bulk Sync process to transmit all outstanding data. From there, data will continue to transmit live.
Bulk Sync can be triggered by using the start button if data has accumulated since sync last stopped and is also triggered if the Start from Date/Time button is used in the publishing application. Start from Date/Time prompts the user to select a date and time (UTC) and will transmit all data from that point to present and then continue to transmit live data.
A Bulk Sync sends a much higher volume of data than typical live publishing. To mitigate any potential fallout should the Bulk Sync be disrupted, a separate Bulk Sync file is saved every hour during the potentially lengthy process. This is intended to minimize the time it would take to restore lost data.
Publish all Available Historical Data
To start publishing from the earliest Historian entry, you can go to the settings tab of the Data Diode Publisher tag properties dialog and click "Reset Published State". You will be prompted to make sure this is your desired action.
Start from Date/Time depends on historical information that will be erased if the published state is reset in the publisher tag property settings. If you select reset published state you cannot skip ahead to the end by trying to start from a more recent date. You will have to let the bulk sync process complete.
Note that Historian tags on the publishing application can be configured to delete data after a specified amount of time has elapsed. In this case, the earliest historian entry will only be as old as the specified time.
Also note that the Historian tags on the client application cannot be configured to delete data after a specified amount of time. The tag will still take a value but the setting will not affect information recieved and stored from Data Diode. The Historian tag on the client application only saves what it receives from the Data Diode Client tag to the local datastore. It cannot create or delete data.
How Does Data Diode Check for Missing Data?
A packet of information is sent from the publishing application to the client application at regular intervals and at the end of a bulk sync. This transmission provides the client application with enough information to check the state of the received transmissions. If the information from the publisher doesn't align with the information received from the client, the Sync Status Indicator widget will show an error, the timestamp (UTC) of the error and the last known in-sync transmission. New information is sent, received and compared at regular intervals until the check is passed and the Sync Status Indicator widget will return to normal, displaying "In Sync"
Data Diode Start Button Widget
Data Diode Start From Date/Time Button
Data Diode Publisher Statistics Dialog
Data Diode Client Statistics Dialog
